China Blue High-definition Disc (CBHD) – often marketed as “China Blu-ray” or 中国蓝光高清光盘 – is not Blu-ray Disc. It is a China-only high-definition optical format derived from HD DVD, launched for the Chinese market after the global format war ended. If you came here looking for PC authoring or playback tools like the ones we list for CVD or AVCHD: the honest answer is that almost none exist in public form.
What CBHD actually is
CBHD started life as CH-DVD (China High-definition DVD), developed by Tsinghua University’s Optical Memory National Engineering Research Center (OMNERC) with the DVD Forum’s blessing to edit HD DVD specifications for China. It was renamed CBHD to stress the blue-violet laser – which is why English coverage often says “China Blu-ray” even though the format is not a Blu-ray Disc Association product.
Capacity: 15 GB single-layer / 30 GB dual-layer (same ballpark as HD DVD)
Physics: DVD-line-friendly; cheaper to tool up than Blu-ray for Chinese plants
Video: PRC-backed AVS (plus AVC / VC-1 as options on players)
Audio: Chinese DRA codec among others
Navigation: Chinese CETC system – not HD DVD Advanced Content (HDi)
Protection: Chinese DKAA, plus an AACS “CBHD” addendum for some titles (China-only licensing)
Despite the HD DVD DNA, finished CBHD discs are incompatible with HD DVD players and with Blu-ray players. It became its own proprietary China-market format.
Authoring: industrial only
There was never a consumer Windows toolchain comparable to DeVeDe, VCDEasy, Nero Vision, or TMPGEnc for CBHD. Commercial titles were authored in locked-down post houses:
CBC (CRC/BMB Audio Visual) – Memory-Tech + China Record Corp. joint venture for encode / author / localize
UOD (Shanghai United Optical Disc) – replication line partner
AACS LA’s CBHD Pre-recorded Book / addendum – licensed manufacturing path, not a downloadable app
Memory-Tech’s earlier HD DVD authoring work with Ulead was for HD DVD, not a free CBHD suite that escaped into the wild. Sonic Scenarist for HD-DVD (which we list under Free Downloads) authors HD DVD Advanced Content – not CBHD/CETC discs.
Playback: hardware, not PC software
Known retail CBHD players were few and China-market:
Shinco: CBHD-9100, CBHD-3800, HD-2100, HD-3700U
TCL: THBD-1008, THBD-1038
We have not found a public Windows (or Mac) application that mounts CBHD discs and plays them with menus the way PowerDVD / ArcSoft TotalMedia Theatre did for HD DVD. Archive.org also has no meaningful CBHD player or authoring software packages to point at.
Loose AVS files are a different story: some AVS-capable Windows players/filters can decode demuxed AVS video. That is not the same as reading a CBHD disc volume, CETC navigation, or DKAA/AACS-protected titles.
AVCHD / Blu-ray authoring rows = BDA-style Blu-ray / AVCHD on DVD media – also unrelated
If you meant mainland Blu-ray Disc (BDA)
Chinese retail Blu-ray Disc titles that follow the Blu-ray Disc Association format are ordinary Blu-ray. Authoring for those is the same global BD / AVCHD toolchain we already document (Scenarist BD-class suites, multiAVCHD, TMPGEnc Authoring Works, and so on). There is no separate “China Blu-ray authoring” product line for BDA discs.
Bottom line
CBHD is a short-lived, China-only HD DVD descendant with its own codecs, navigation, and protection. Support for hobbyists today is mostly historical knowledge plus surviving Shinco/TCL players – not a Free Downloads section full of PC tools. We keep this article under Support so the difference stays clear when someone searches for “China Blu-ray.”
Historical reference only. We do not host CBHD disc images, keys, or circumvention tools.
8KDVD’s retail silhouette is deliberate: a red, DVD-sized case so the format reads as its own object on a shelf full of blue Blu-ray keep cases and black DVD Amarays. Packaging is part of the specification’s public face – logo placement, the project URL, and honest technical callouts matter as much as the VP9 bits inside.
Why the case is DVD-sized and red
DVD footprint keeps mailers, shelves, and existing DVD case stock usable. The red plastic (or red wrap on a clear/standard shell, depending on your supplier) is the quick visual ID. Do not ship 8KDVD in unmarked Blu-ray cases “because the disc is a BD-R”; you will train customers to look for the wrong shape.
Artwork workflow
Download the official Photoshop box template (front, spine, back, QR placeholder, info box) from the project downloads.
Replace key art; keep the mandatory 8KDVD branding and 8kdvd.hddvd-revived.com on the back per the current license.
Fill the info box: runtime, year, cast or crew highlights, audio/subtitle languages, and which resolutions ship (8K / 4K / HD / 3D).
Add a QR to your film page or catalogue entry if you use one; empty QR layers look like unfinished print.
Export print-ready PDF/JPG at the template’s bleed settings; proof on paper before a full case run.
What to print on the back (technical honesty)
Encode profile class if it sets expectations (e.g. Standard feature vs HQ Plus short).
Playback note: Windows Player and Chromium HTML launcher – no claim of a mass-market set-top deck unless you ship one.
Media type: BD-R 25 GB / 50 GB / BD-XL as applicable.
Subtitle languages and whether they are soft or burned-in.
Disc face and inserts
Label the disc hub clearly with title and “8KDVD.” A bare silver BD-R in a fancy sleeve confuses archivists five years out. Optional booklets help for chapter lists and restoration notes; keep type large – this is living-room packaging, not a CD jewel booklet.
Licensing and branding checklist
Low-budget, free, crowdfunded, and many CC projects can use the artwork and tools under the project’s published free tier; larger commercial budgets owe the modest percentage fee capped in the white paper. Either way, mandatory naming and logo rules still apply. Do not slap third-party Blu-ray or generic “8K” logos on the wrap unless you hold those separate licenses – the 8KDVD marks are not a substitute for Blu-ray Association marks.
Presentation tips for demos and sales
Show the red case first, then the menu’s resolution switch – that sequence explains the format faster than a codec lecture.
Have a Standard or HQ Plus sample ISO ready so buyers can mount without waiting on a burn.
If the title includes 3D anaglyph, pack glasses or state that none are included.
For mail-order, double-box fragile red shells; a cracked hinge turns a careful encode into a returns ticket. Include a one-sheet with the Windows Player download path and a reminder to use UDF-capable mounts for ISOs. Collectors photograph spines – keep title typography consistent across a series so 8KDVD reads as a line, not one-off DIY.
Templates, license text, and sample boxed editions are documented on 8kdvd.hddvd-revived.com. The red box is not decoration; it is how people find the format when the spine is six metres away.
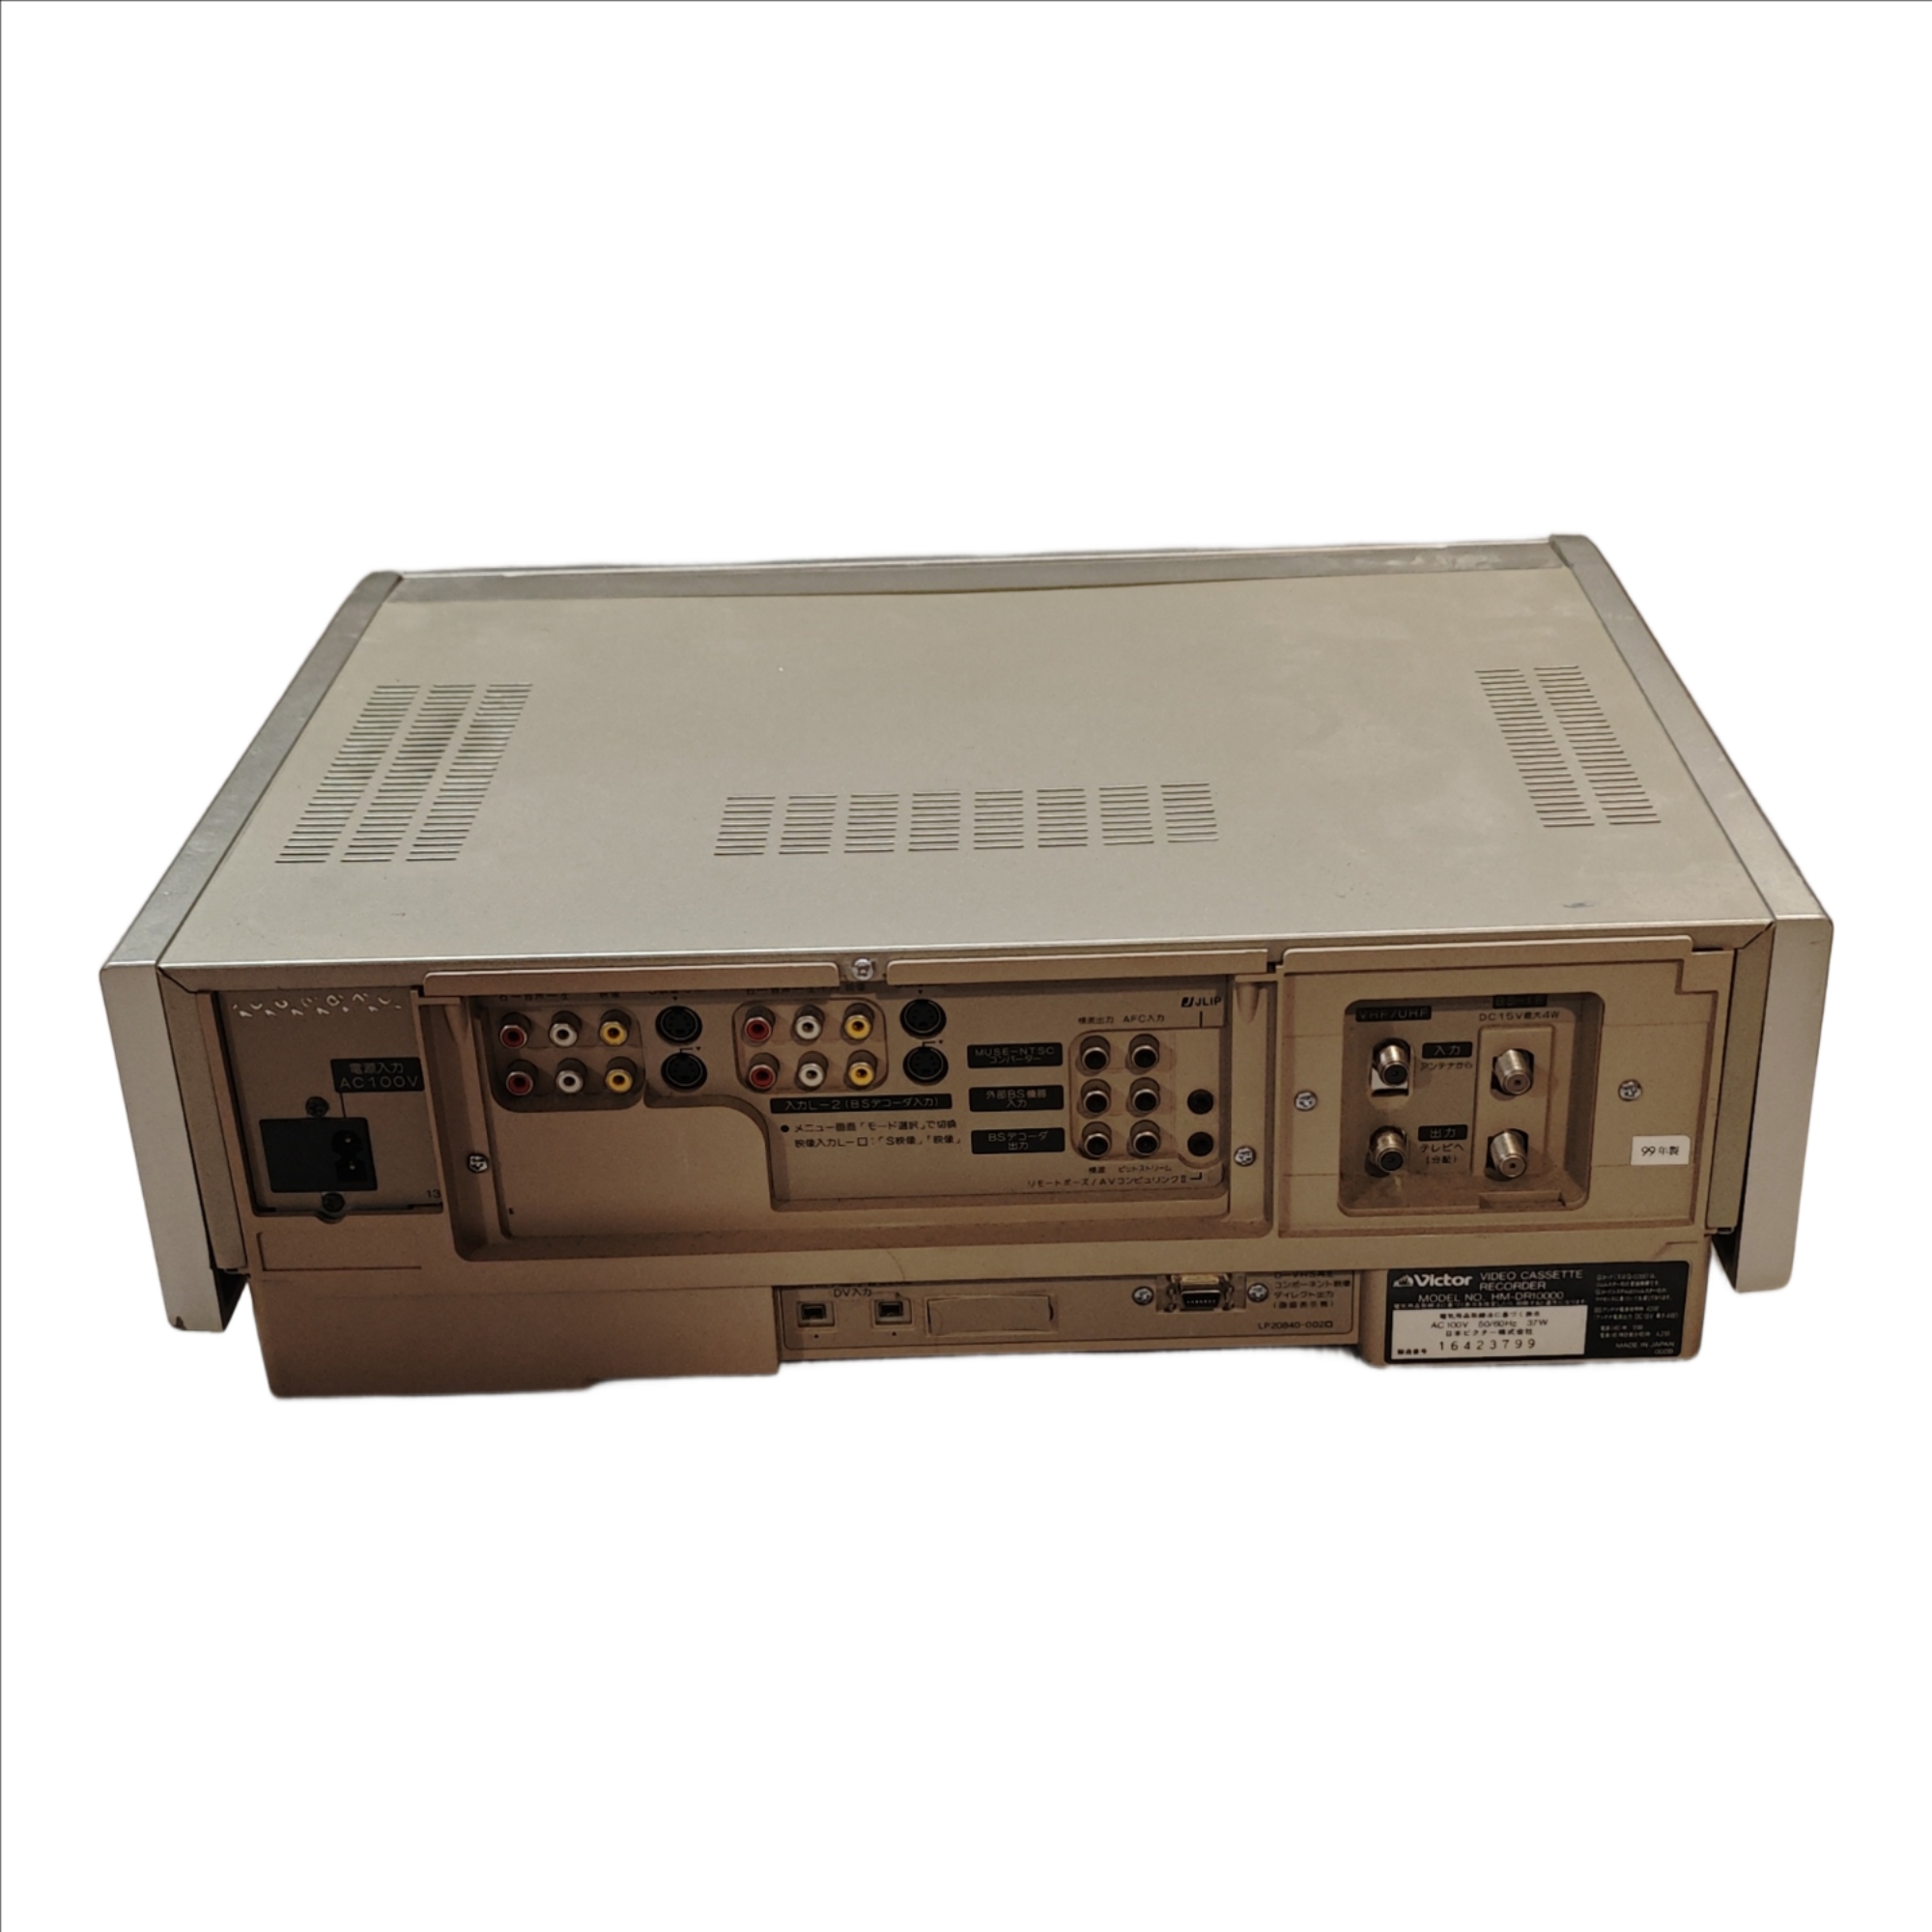
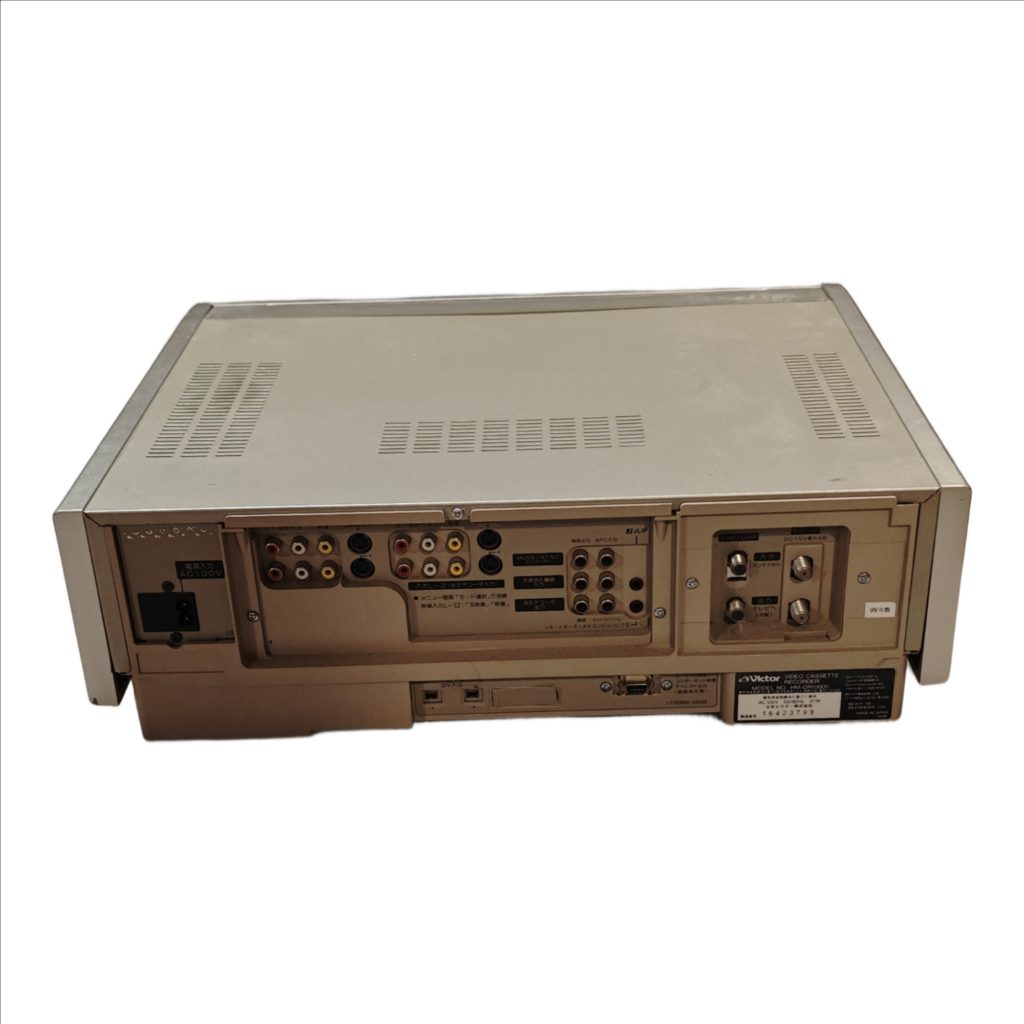
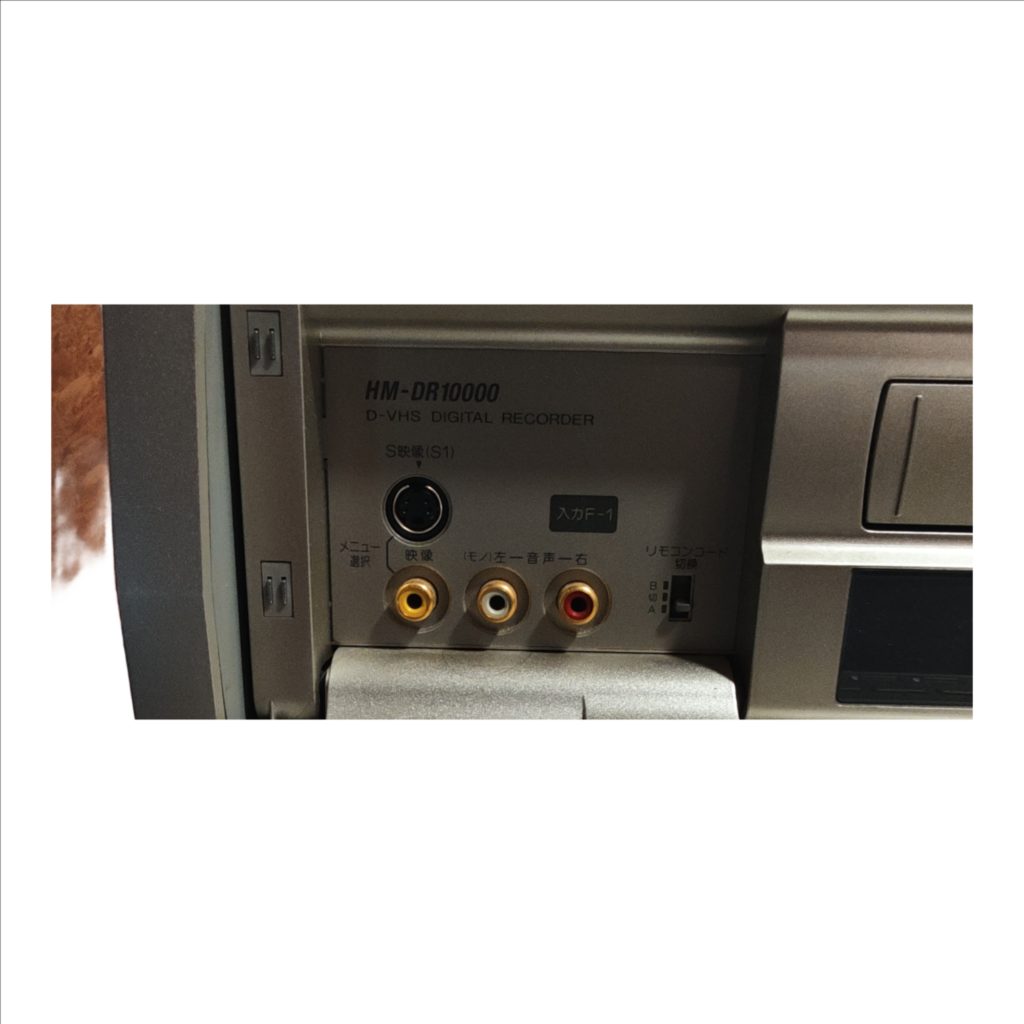
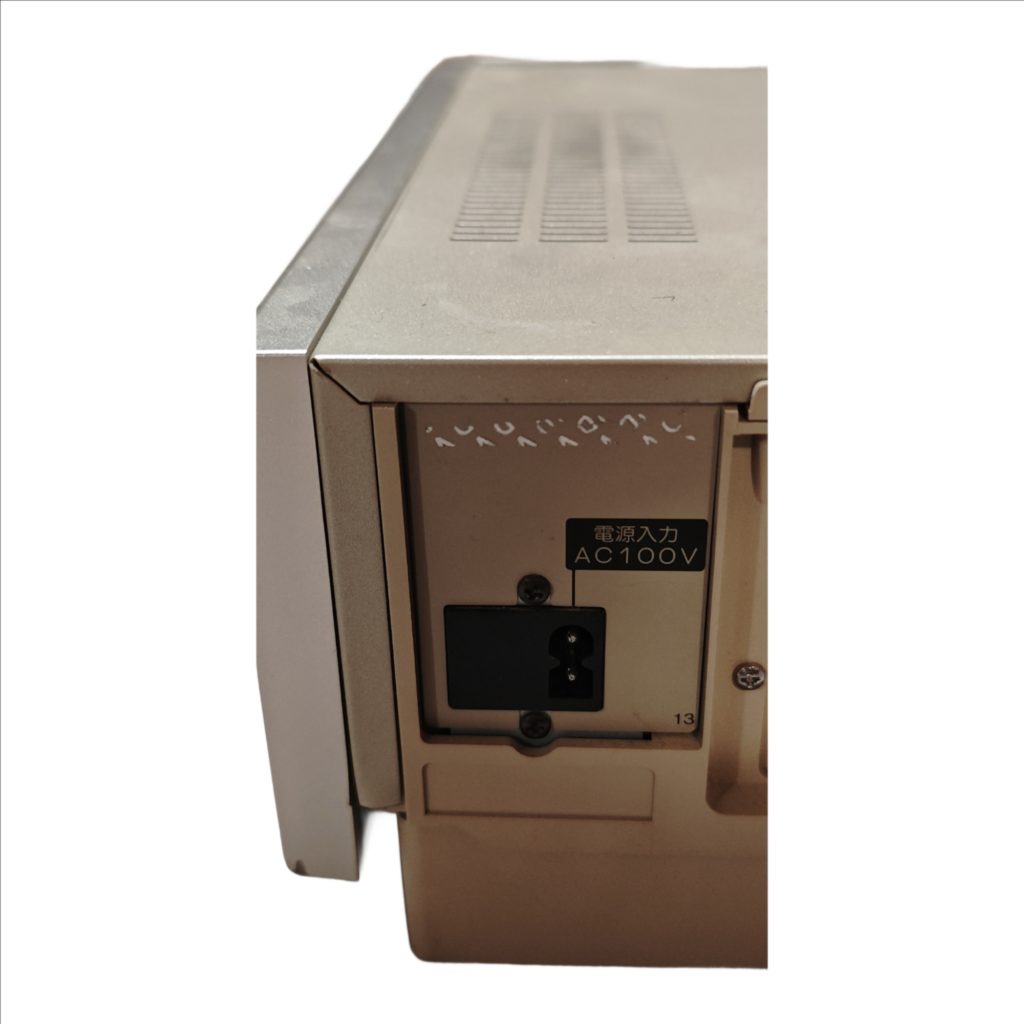
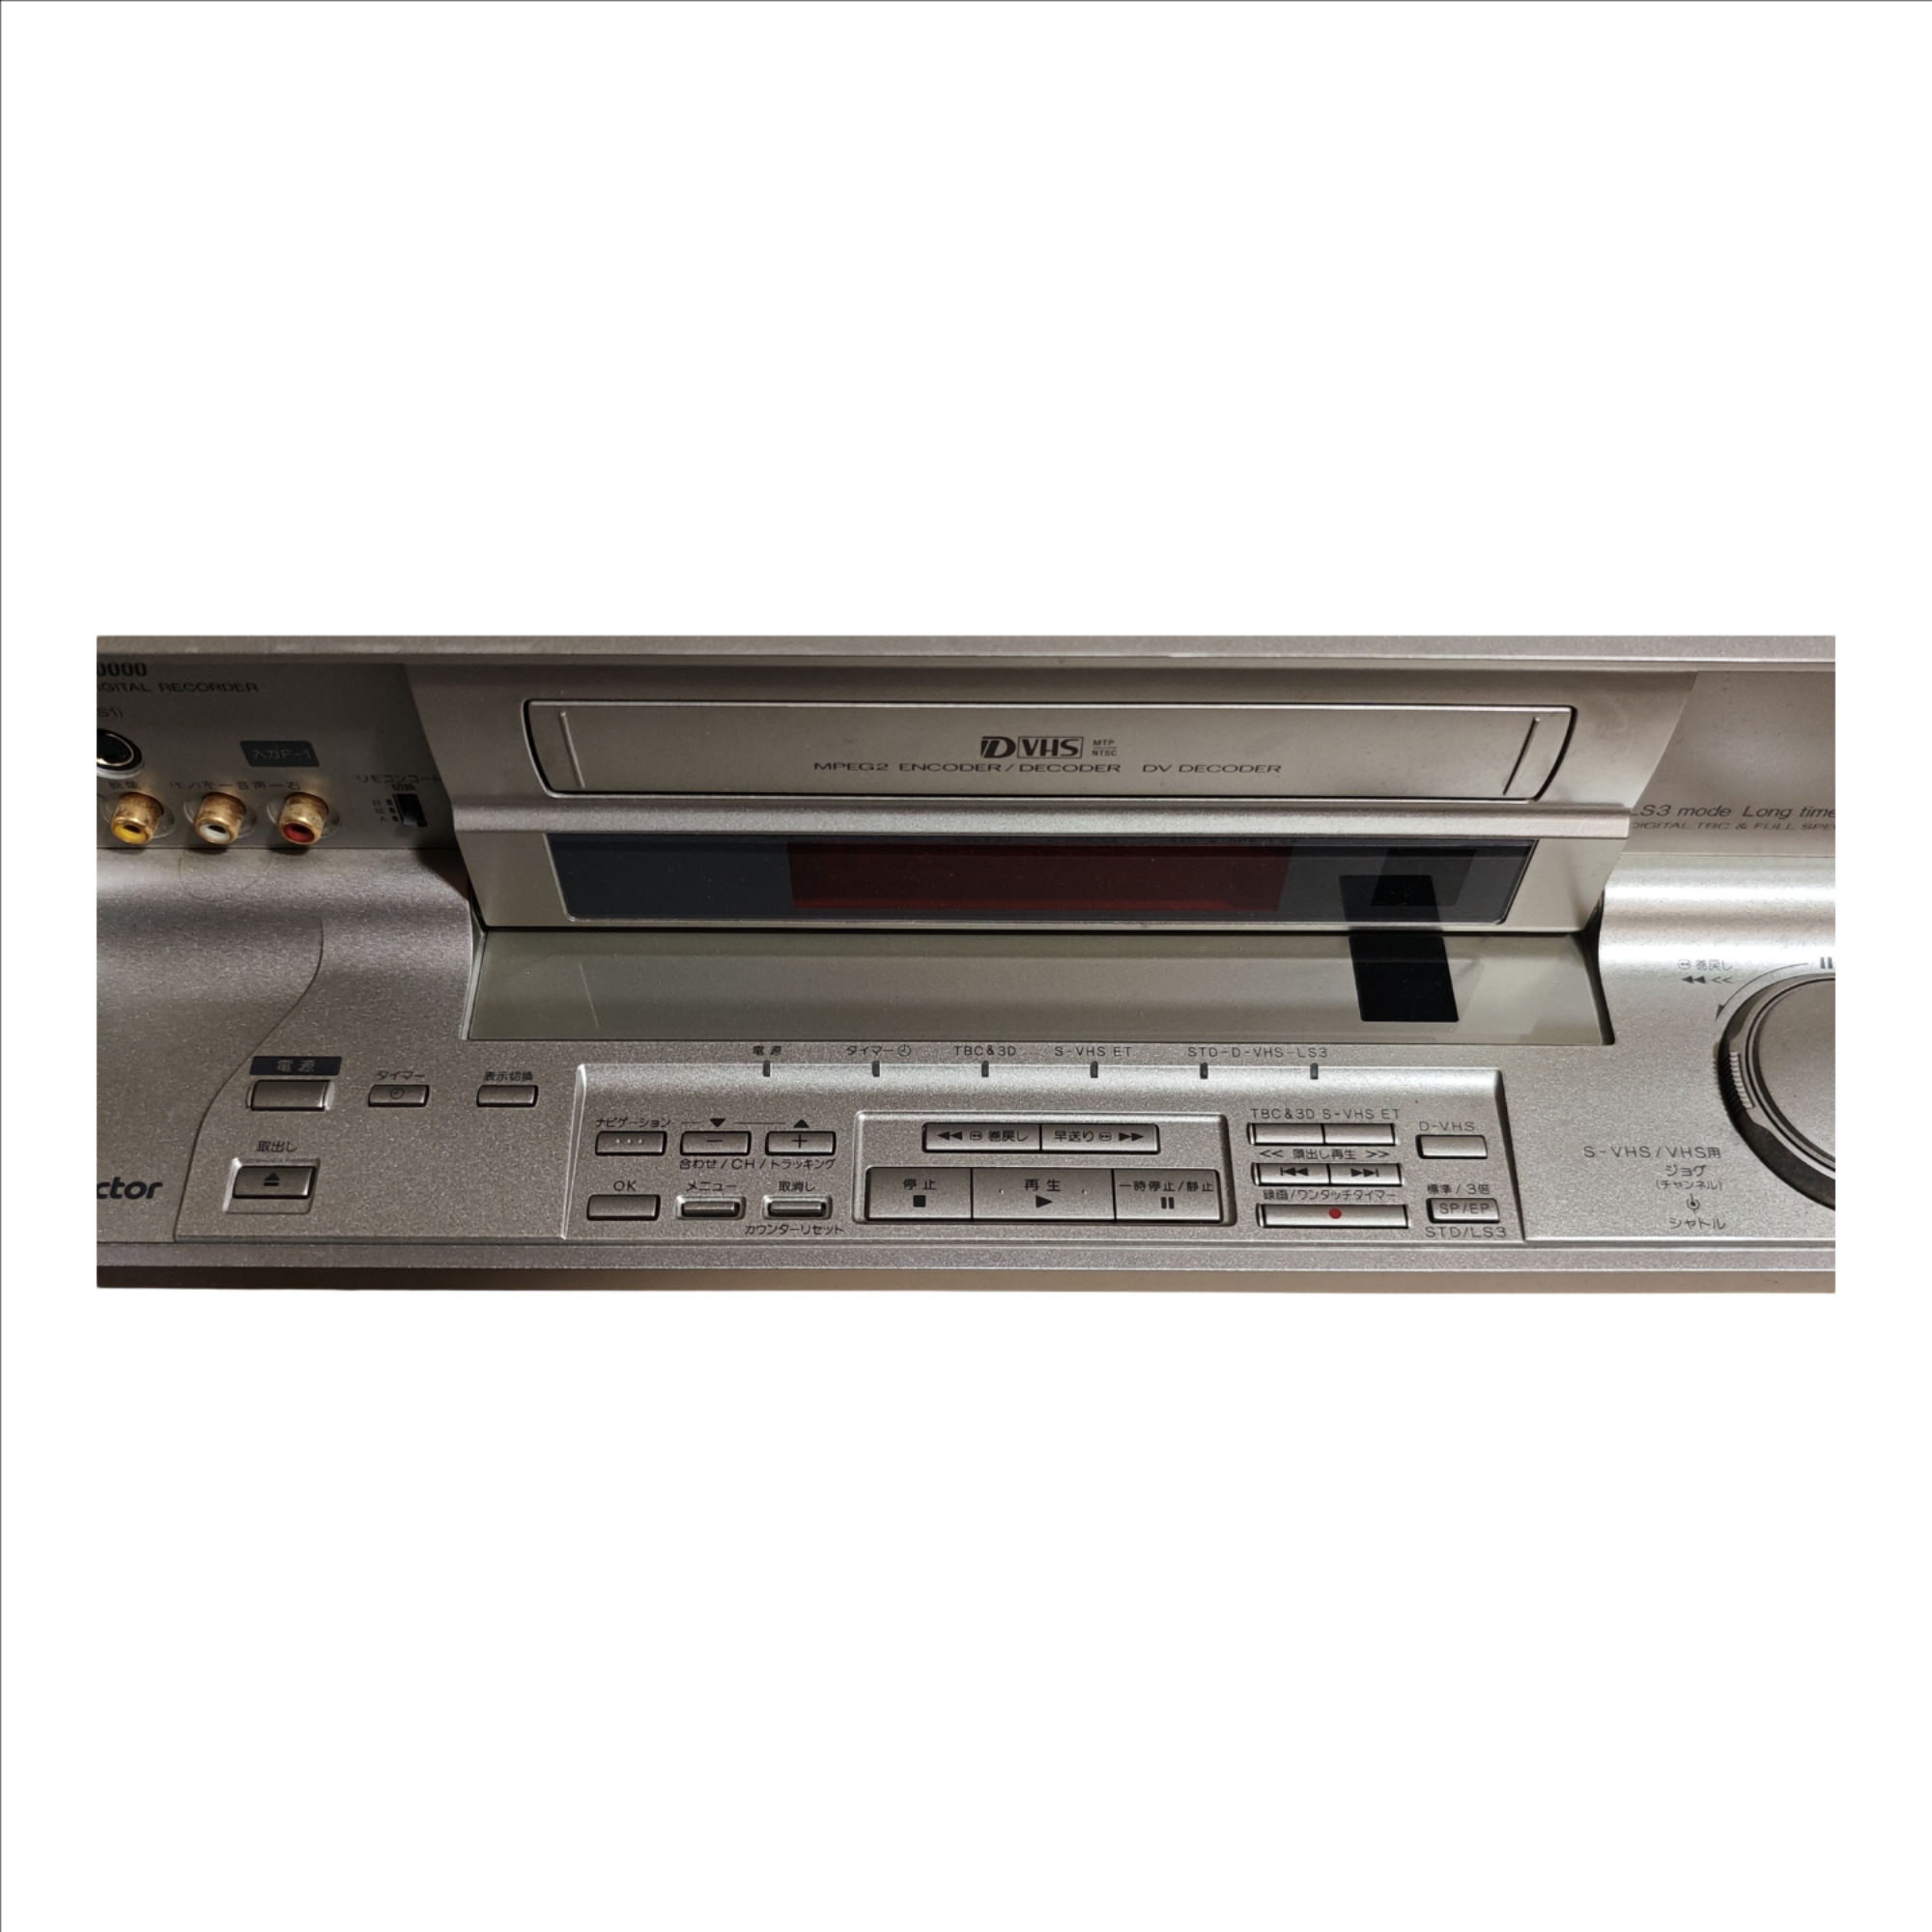
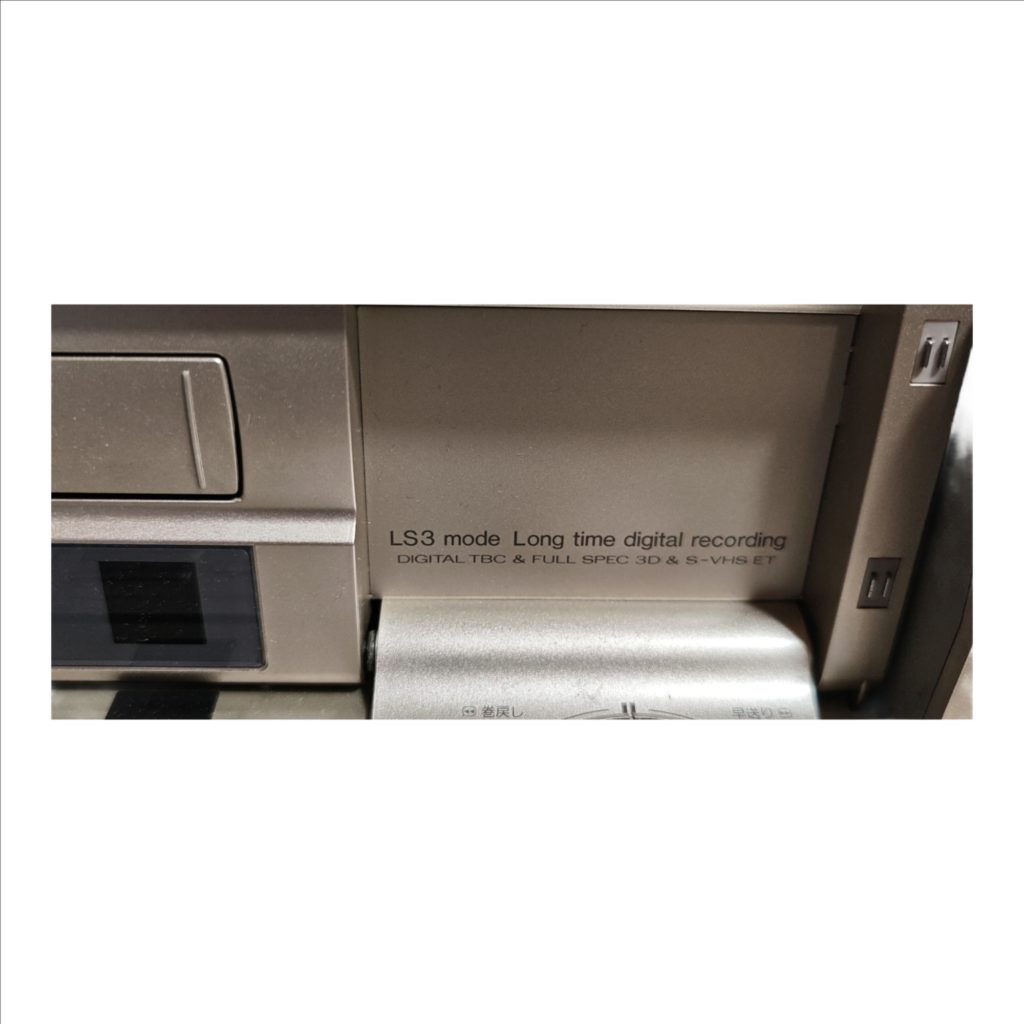
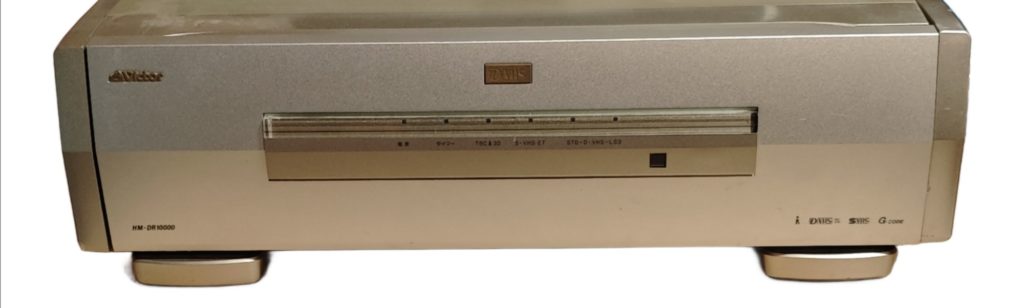
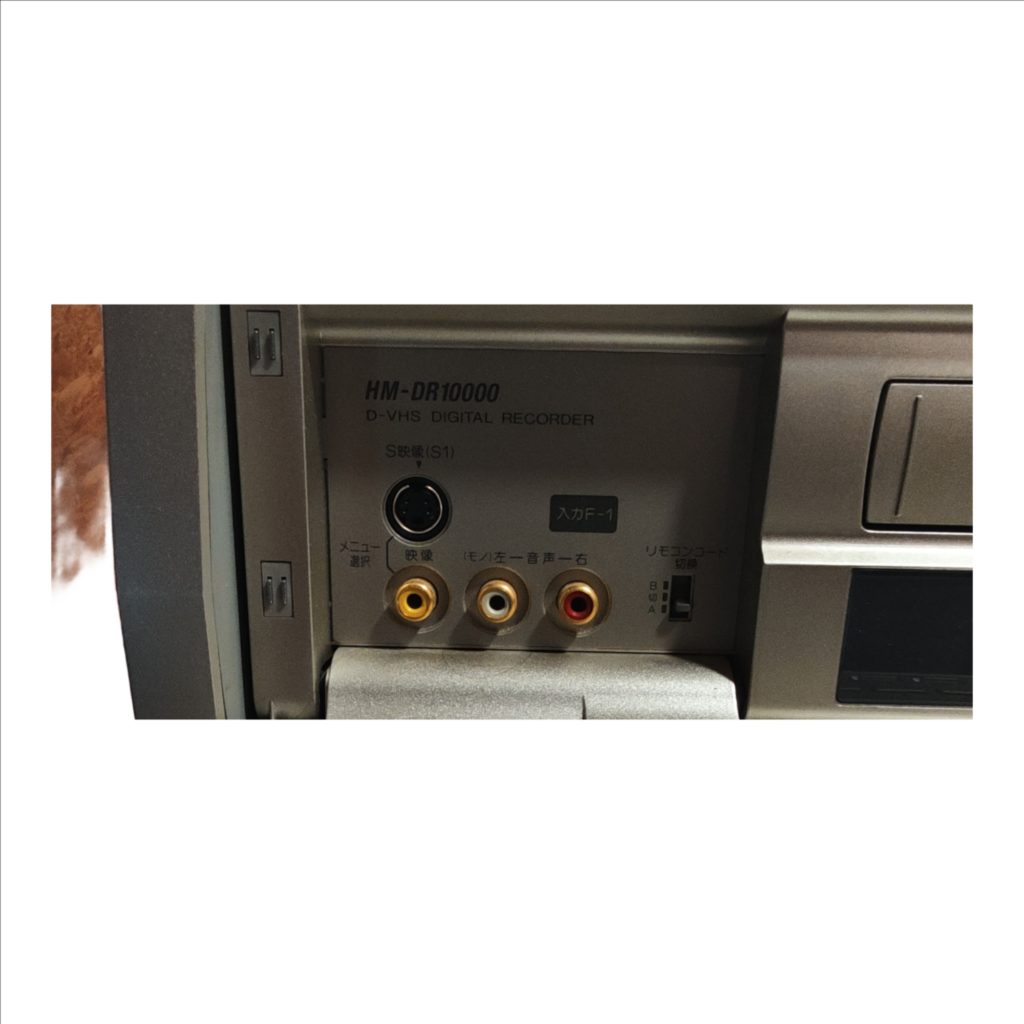
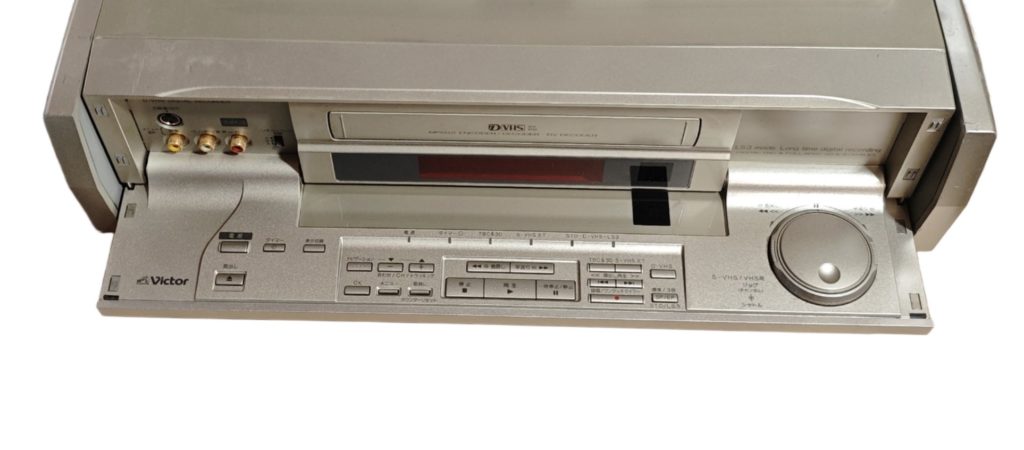
The Victor HM-DR10000 is a D-VHS deck that records and plays both analog VHS/S-VHS tapes and digital D-VHS tapes, with built-in MPEG-2 processing, digital TBC/3D-NR, S-VHS ET, and selectable speeds including STD and LS3 for long-play. A flip-down front door provides quick-connect F-1 inputs (S-Video, composite, L/R audio) and full transport/navigation controls with a jog/shuttle for precise search, while the rear panel offers permanent A/V inputs/outputs (composite, S-Video, stereo audio), RF antenna loop-through, BS-IF pass-through, a D1 video output, and an AC100V mains inlet for fixed installation.
The rear of the Victor HM-DR10000 is the permanent-hookup side: mains power, baseband A/V I/O, RF loop-through, and a D1 video connector. Use the front flap for quick, temporary sources; use the rear for your TV/receiver, capture device, and antenna/satellite pass-through.
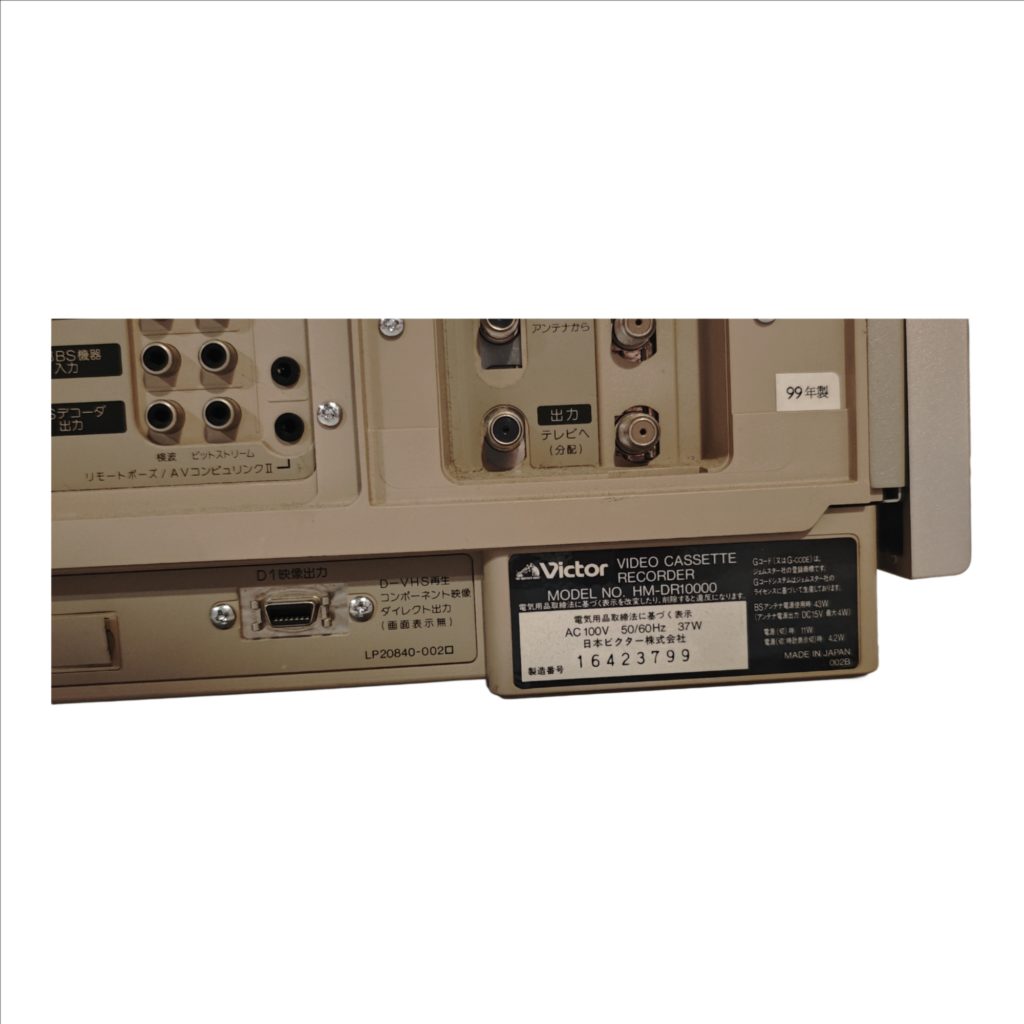
Power Inlet (電源入力 AC100V)
The rectangular socket labeled 電源入力 AC100V is the mains inlet. It accepts the deck’s two-pin Japan-market power lead. It carries power only. If your wall supply is not 100 V AC, use a suitable step-down before this inlet. The front Power button controls on/off once the cord is connected.
Composite Video Output (映像 出力・黄色)
The yellow RCA jack marked 映像 in the 出力 group sends standard-definition interlaced video. It carries 480i for NTSC sources (this deck’s native system). It does not carry audio. Use this when your TV or capture device lacks S-Video or D-terminal. Picture quality is lower than S-Video because color and brightness are combined.
Stereo Audio Outputs (音声 出力 左=白/右=赤)
The white and red RCA jacks in the 出力 group send analog line-level stereo. They carry sound only. Pair them with either Composite Output, S-Video Output, or D1 Output for a complete A/V connection to a TV, receiver, or capture device.
S-Video Output (S映像 出力)
The round mini-DIN labeled S映像 in the 出力 group sends standard-definition interlaced video with luma and chroma separated. It carries 480i. It does not carry audio. Use S-Video plus the white/red audio outputs for the cleanest analog SD picture when your display or capture device supports S-Video.
Composite Video Input (映像 入力・黄色)
The yellow RCA jack in the 入力 group receives standard-definition interlaced video from another device for recording. It accepts 480i. It does not accept audio. Use it when your source has only composite video.
Stereo Audio Inputs (音声 入力 左=白/右=赤)
The white and red RCA jacks in the 入力 group receive analog line-level stereo from a source you want to record. They carry sound only. Always connect these alongside Composite Input or S-Video Input when making an analog recording.
S-Video Input (S映像 入力)
The round mini-DIN labeled S映像 in the 入力 group receives standard-definition interlaced video for recording. It accepts 480i. It does not accept audio. Use it with the white/red audio inputs from the same source for the best analog recording quality.
D-Terminal Video Output (D1信号出力)
The thin blade-style jack labeled D1信号出力 is a Japanese D-terminal. “D1” denotes 480i component-style analog video. It carries video only, no audio. Use it when your display or scaler has a D-terminal input or an appropriate D-to-component (Y/Pb/Pr) cable. It does not output 480p/720p/1080i; it is strictly SD interlaced.
i.LINK / IEEE1394 / FireWire Ports (i.LINK)
The two small square i.LINK ports are IEEE1394. They carry digital data streams, not analog audio/video. They support DV camcorders (DV25 at 480i/576i, depending on the cam) and MPEG-2 transport streams between D-VHS decks and compatible digital tuners. Use i.LINK to record or play digital sources at native resolution and bitrate. When an HD broadcast is recorded via i.LINK, full resolution remains on tape and is available again over i.LINK; the deck’s analog outputs still display standard-definition during playback.
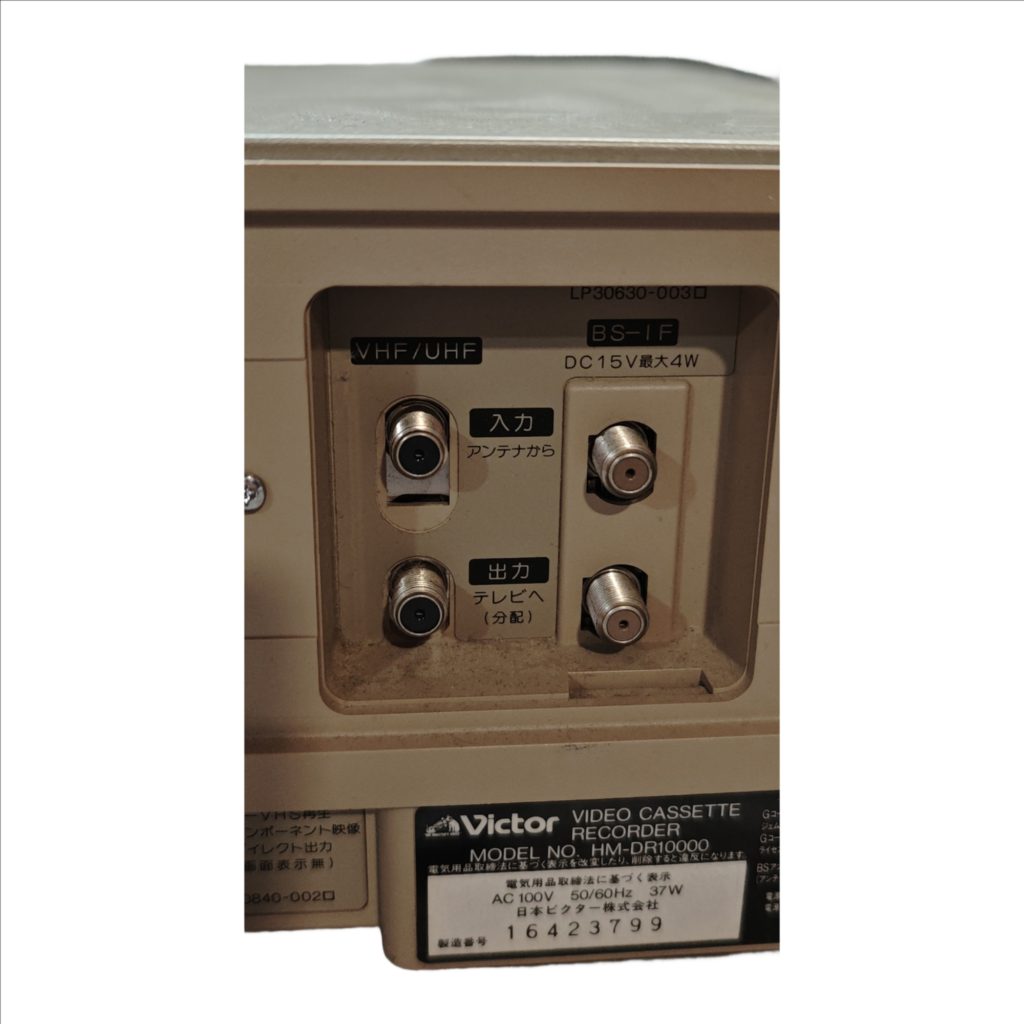
RF Terrestrial Pass-Through (VHF/UHF 入力/出力)
The pair of threaded F-type jacks labeled VHF/UHF are a loop-through for a rooftop or indoor antenna. 入力(アンテナから) is the antenna feed in. 出力(テレビへ/分配) passes that same RF on to the TV or a splitter. These are not audio/video jacks for your tape playback; they exist so your TV’s tuner still sees broadcast signals with the VCR in line.
Satellite IF Pass-Through (BS-IF DC15V 最大4W)
The adjacent pair of F-type jacks marked BS-IF provide a through-path for a satellite intermediate-frequency feed. The label DC15V 最大4W indicates the path can pass up to 15 V at 4 W to power an inline satellite device. They do not output the VCR’s picture or sound and are not used for capturing or watching tapes.
Control Ports (リモートポーズ/AVコンセントリンク)
The small control mini-jacks near the A/V cluster are low-voltage control lines for compatible Victor/JVC equipment. They start/stop the deck for synchronized dubbing. They do not carry audio or video and are not for headphones or microphones.
What Each Connection Lets You Record
Composite Input and S-Video Input feed the deck’s analog recording path. Both are limited to standard-definition interlaced (480i). S-Video yields cleaner color separation than composite. The i.LINK ports feed the digital recording path and can store DV camcorder streams at native DV resolution and digital broadcasts as MPEG-2 transport streams, including HD content when supplied by a compatible tuner or D-VHS source. The RF pass-throughs do not record anything by themselves; they simply route antenna or satellite RF to other devices.
What Each Connection Lets You Play
Composite Output, S-Video Output, and D1 Output provide standard-definition interlaced video for any tape type. Use the stereo audio outputs for sound. The i.LINK ports provide a digital stream back out for devices that can decode DV or MPEG-2 transport; this is how you access full-resolution digital recordings made via i.LINK. The RF pass-throughs do not output the deck’s playback.
Resolution and Signal Behavior
All analog rear video jacks-Composite Output, S-Video Output, and D1 Output-deliver 480i. None of these carry audio. Audio always travels on the white/red RCA outputs. Analog inputs accept 480i only. i.LINK transports digital streams at their source resolution and bitrate; DV camcorders are 480i/576i in DV25, while digital broadcasts or D-VHS sources can be SD or HD. Full HD remains within the i.LINK domain and on tape; analog viewing remains SD.
Hooking Up to a Television
If the TV has S-Video and stereo RCA, connect S映像 出力 to the TV’s S-Video input and connect white/red 音声 出力 to the TV’s left/right audio inputs. Select that S-Video input on the TV. If the TV lacks S-Video, use Composite Output (yellow) plus the white/red audio outputs and select that AV input on the TV. If the TV supports D-terminal, connect D1信号出力 and add the white/red audio outputs, then select the D-input.
Hooking Up to an AV Receiver or Scaler
Connect either S-Video Output or Composite Output plus the white/red audio outputs to the receiver/scaler’s corresponding inputs. Route the receiver/scaler to the TV as usual. If the scaler accepts D-terminal, use D1信号出力 with separate white/red audio for the cleanest SD analog path the deck provides.
Hooking Up to a Capture Device
Connect S-Video Output to the capture device’s S-Video input and connect white/red audio outputs to the capture device’s stereo inputs. In capture software, select S-Video and line-level stereo. If the capture device lacks S-Video, use composite video plus white/red audio. For lossless digital ingest of DV or D-VHS streams, connect i.LINK to a compatible IEEE1394 interface and ingest the digital stream directly.
Recording from an Analog Source at the Rear
Connect the source’s S-Video or composite video to S映像 入力 or 映像 入力 and connect its white/red audio to 音声 入力 左/右. On the deck, select the corresponding Line input and press Record. The deck stores the incoming 480i signal; S-Video reduces color bleed compared with composite.
Recording from a DV Camcorder over i.LINK
Connect the camcorder’s IEEE1394 port to the deck’s i.LINK. Set the deck to i.LINK input, press Record on the deck, then Play on the camcorder. The deck writes a direct digital copy at native DV resolution with no analog conversion.
Recording a Digital Broadcast or Another D-VHS via i.LINK
Connect the digital tuner or D-VHS deck to i.LINK. Set this deck to i.LINK input and record. The MPEG-2 transport stream is written at its original resolution and bitrate, including HD when provided. Playback at full resolution is available again via i.LINK to a compatible device; analog rear outputs remain SD for viewing.
Using the RF and Satellite Pass-Throughs
Connect the rooftop or indoor antenna to VHF/UHF 入力(アンテナから) and connect VHF/UHF 出力(テレビへ/分配) to the TV’s antenna input. This preserves broadcast reception through the VCR. For satellite, connect the dish/LNB or BS tuner feed to BS-IF IN and pass it to BS-IF OUT, staying within the DC15 V 4 W pass-power printed on the label.
Choosing the Best Analog Picture Path
Prefer S-Video for the cleanest SD analog picture if your TV or capture device supports it. Use Composite when S-Video is unavailable. Use D1 when your display supports the Japanese D-terminal and you want component-style 480i from this deck. Always add the white/red audio pair to carry sound.
Verifying You’re on an Output, Not an Input
Before troubleshooting, confirm your cable is on 出力 when going to a TV/receiver/capture, and on 入力 when coming from a source you intend to record. Matching labels prevents the common “no picture” error.
Basic Troubleshooting Without Prior Experience
If the TV shows black-and-white after you used S-Video, change the TV to its S-Video input; many sets treat S-Video and composite as separate selections on the same jack cluster. If you have sound but no picture, re-check that the yellow or S-Video plug is on an output and that the TV is on the correct input. If you have picture but no sound, reseat the white/red plugs and select line-level stereo, not “mic,” on capture devices.
Japanese-to-English Translation Key (Rear Labels)
電源入力 = Power input 映像 = Video (composite) 音声 左/右 = Audio Left / Right S映像 = S-Video 入力 = Input 出力 = Output D1信号出力 = D-terminal 480i video output i.LINK = IEEE1394 / FireWire VHF/UHF 入力(アンテナから) = Antenna in VHF/UHF 出力(テレビへ/分配) = Out to TV / distribution BS-IF = Broadcast Satellite intermediate frequency DC15V 最大4W = DC 15 V power-pass limit リモートポーズ/AVコンセントリンク = Remote Pause / AV Compu Link
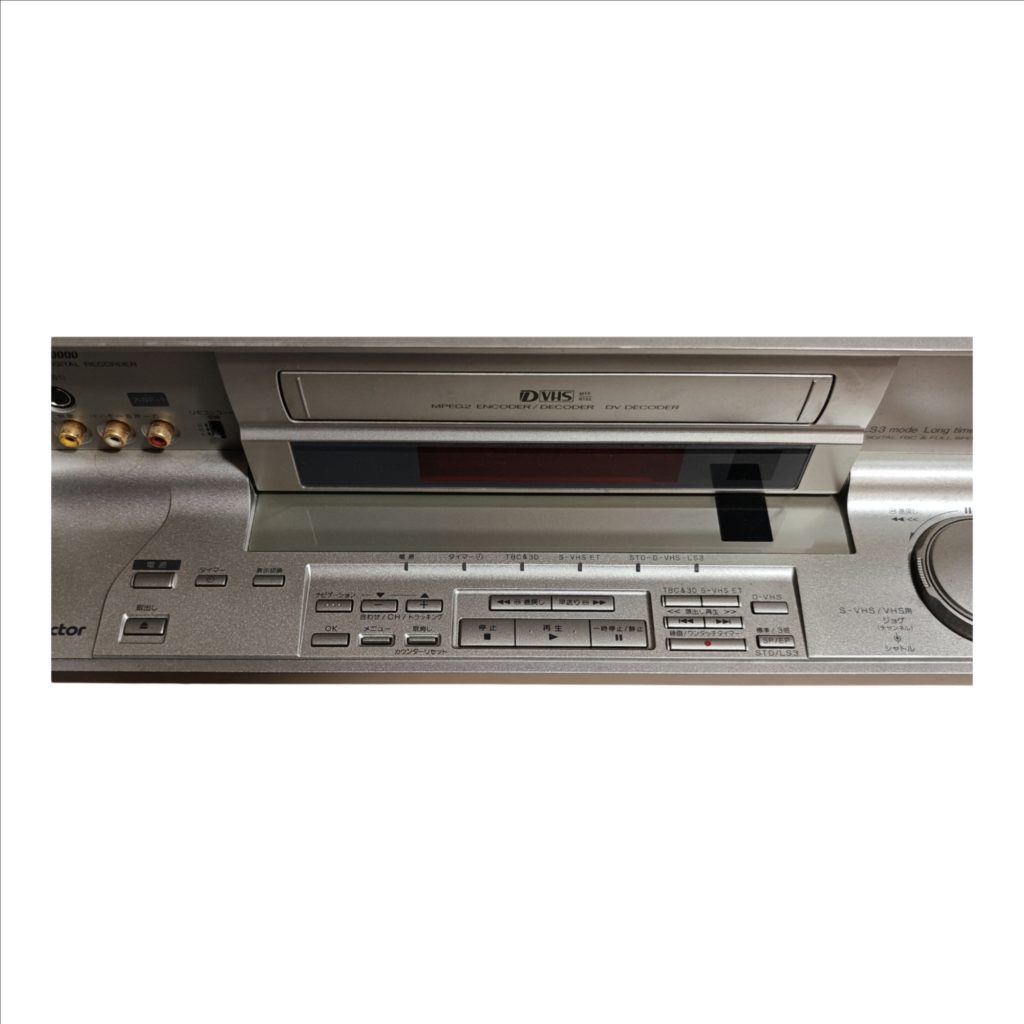
The Victor HM-DR10000 is a D-VHS digital video recorder that handles both analog VHS/S-VHS tapes and digital D-VHS recordings. A flip-down front door reveals quick-connect inputs and a full control bed, so you can dub from a camcorder, tweak tracking, and run transport without the remote. The center display has status lamps for Power, Timer, TBC&3D, S-VHS ET, and D-VHS speed (STD or LS3).
Front Overview
Left pocket “Input F-1” holds an S-Video jack and three RCA jacks (yellow composite video, white left/mono audio, red right audio) plus a tiny A/B switch to change the remote control code when you own multiple Victor decks. The cassette slot and window sit in the middle under the status strip. The right side carries a large jog/shuttle wheel for precise search when playing VHS/S-VHS tapes; the inner knob jogs frame-by-frame and the outer ring shuttles fast forward/back.
Basic Operation
To record from the front, plug your source into Input F-1, insert a tape, choose a speed (Standard/3× or SP/EP for VHS; STD/LS3 for D-VHS), press the Record/One-Touch Timer bar, then Stop to finish. To play, insert a tape, press Play, use Rewind/Fast-forward to navigate, Pause/Still to freeze, the jog/shuttle for fine search, and Counter Reset to zero the counter. Use Menu, OK, Cancel, and the Minus/Plus keys to set channels, inputs, and tracking.
Main Controls by Position
Bottom left corner: Eject → Power → Timer. Navigation block (immediately right of Timer): top row Minus and Plus (Adjust/CH/Tracking); below them OK (left), Menu (center), Cancel (right); “Counter Reset” is printed beneath. Transport cluster (to the right of Navigation): top row Rewind (left) and Fast-forward (right); bottom row Stop (left), Play (center), Pause/Still (right). Directly right of transport: Step-Playback rocker; below it the wide Record/One-Touch Timer bar with a red dot. Far right column (three small stacked keys): top = Standard/3×, middle = SP/EP, bottom = STD/LS3. Far right dial: Jog/Shuttle wheel for S-VHS/VHS playback/search.
Japanese-to-English Translation Key
電源 = Power タイマー = Timer TBC&3D = Digital time-base correction & 3D noise reduction S-VHS ET = S-VHS Extended Technology STD-D-VHS-LS3 = D-VHS mode indicators (Standard / Long Stream 3) S映像(S1) = S-Video input (S1) 入力F-1 = Input F-1 (front inputs) 映像 = Video L/モノー音声-左 = Left audio / Mono 音声-右 = Right audio リモコンコード 切換 A/B = Remote control code selector A/B 取り出し = Eject ナビゲーション = Navigation 合わせ/CH/トラッキング = Adjust / Channel / Tracking メニュー = Menu 取消し = Cancel カウンターリセット = Counter Reset 巻戻し = Rewind 早送り = Fast-forward 停止 = Stop 再生 = Play 一時停止/静止 = Pause / Still 繰出し再生 = Frame-step playback 前/次 = Previous / Next (index search) 録画/ワンタッチタイマー = Record / One-Touch Timer 標準/3倍 = Standard / 3× extended play SP/EP = Standard Play / Extended Play STD/LS3 = D-VHS Standard / Long Stream 3 ジョグ/シャトル = Jog / Shuttle S-VHS/VHS用 = For S-VHS/VHS use
Video File Maker exposes four named encode profiles – HQ Plus, HQ, Standard, and LP – so authors can match VP9 Profile 2 bitstreams (with Opus audio) to disc capacity and runtime instead of guessing CRF values in a vacuum. Pick the profile before you spend overnight GPU time; the menu and the blank must agree with that choice.
Shared rules
Output family: VP9 Profile 2; audio Opus as required by the format body of standards.
Batches: separate SDR and HDR10 scripts – HDR preserves metadata when the source carries it; SDR batches will not invent a grade.
Source: export SOURCE.mp4 at full 8K (7680×4320) when the project truly is 8K; lesser masters should not wear an 8K badge on the box.
Media: plan against 25 GB and 50 GB BD-R, or BD-XL when you need more than a single-layer/dual-layer pair can hold.
HQ Plus
Short premium 8K. Use it for demos, shorts, and showpiece reels where bitrate beats runtime. Sister-site guidance cites roughly seventy minutes near the ~22 GB class for the 8K tier as a planning ballpark – treat that as capacity intuition, then measure your own encode. If your “feature” is two hours, HQ Plus is the wrong button.
HQ
High-bitrate mastering for 8K/4K when you want headroom without the ultra-short constraint of HQ Plus. Suitable for prestige shorts-to-mid features and for keeping 4K fallbacks looking expensive. Expect to lean on 50 GB or BD-XL blanks once runtime climbs.
Standard
The workhorse: about a 100-minute movie on 50 GB-class media. First commercial-style titles and most fan restorations should start here. Standard is also the profile you use to teach the rest of the toolchain – if Standard will not burn and play cleanly, chasing HQ Plus will only hide the same folder or UDF mistakes under prettier pixels.
LP (Long Play)
Pack longer programmes onto 25 GB blanks (or stretch capacity when you refuse a second disc). Detail and high-motion scenes take the hit first. LP is honest engineering for lectures, long concerts, or archive dumps – label the case so nobody expects HQ Plus sharpness.
Choosing quickly
Measure runtime and whether you need true 8K on-disc.
If ~100 minutes and one 50 GB blank → Standard.
If short and showpiece 8K → HQ Plus.
If long and stuck on 25 GB → LP.
If mid-length with quality priority and larger blanks → HQ.
Batch discipline
Run the profile batch that matches the blank you bought. Confirm file sizes before Menu Maker; oversized HQ Plus outputs will not “fit if we omit the menu.” Multi-resolution discs often keep a hero tier at one profile and lighter 4K/HD companions – the menu must list only what exists. After encode, verify VP9 Profile 2 / Opus with your usual media inspector, then assemble UDF 2.60.
After the burn, spot-check a high-motion scene and a dark static scene at the hero resolution. Profile names will not save a bad master – soft focus stays soft – but they will stop you from promising eighty minutes of HQ Plus on a single 25 GB blank. Log the profile on an internal README next to the ISO so remasters six months later use the same contract.
Profile tables, Video File Maker releases, and the authoring guide live on 8kdvd.hddvd-revived.com. Profiles are capacity tools; use them that way and the red box will match the bits inside.
Subtitles on 8KDVD sit in an awkward but workable middle ground: the disc UI is browser-based HTML, the video is VP9 Profile 2 with Opus, and there is no Blu-ray-style presentation graphics engine guaranteeing every deck will render the same soft-sub track. Plan for Chromium and the Windows Player, time your cues carefully, and decide early whether you need switchable soft subs or burned-in text that cannot miss.
Soft subs vs burn-in
Soft (SRT / WebVTT alongside the menu or player): switchable languages, no re-encode when you fix a typo, better for accessibility and multi-region discs. Depends on the player/launcher honouring the track or the HTML <track> / player API path you wire up.
Burn-in (hardcoded into the VP9 encode): universal – whatever opens the video shows the text – but locks language, burns bitrate on glyphs, and forces a full re-encode for corrections.
Prefer soft for dialogue; reserve burn-in for forced narrative cards you refuse to lose, or for archive titles where one language must always appear.
Timing SRT and WebVTT for browser menus
Export a dialogue list from your NLE or subtitle editor with the same frame rate as the master (23.976 vs 24 vs 25 mismatches are the classic “everything drifts after reel two” bug).
Author in SRT first for ease; convert to WebVTT when the HTML5 video element or launcher expects .vtt.
Keep timestamps in HH:MM:SS.mmm (WebVTT) or HH:MM:SS,mmm (SRT) consistently – mixed separators break parsers silently.
Cue length: aim for readable chunks (roughly one to two lines, ≤42 characters per line for living-room distance).
Place cue files where Menu Maker / the launcher expects them; reference them from the menu or player config – orphan .srt files will not invent a track list.
Smoke-test in Chromium: enable the track, scrub mid-film and credits. Use UTF-8; mixed encodings often fail after the first reel.
Sync tips that actually matter
Spot-check against a clap or a known line, not against “feels right.”
If the whole track is late/early by a constant, shift globally; if drift grows, your frame-rate assumption is wrong – fix the root, do not nudge every tenth cue by hand.
If the menu offers both 8K and 4K streams with different leaders, one subtitle file will drift on the other. Pad cues per stream or keep leaders identical.
HDR grades can make white text disappear on bright skies; use outlined or shadowed styles when the player allows CSS/WebVTT styling.
Wiring soft subs into the disc UI
Soft subs usually arrive as SRT converted to WebVTT, referenced from the menu page or a small config the Windows Player understands.
One file per language, named clearly (en.vtt, de.vtt), UTF-8 without a BOM if a browser chokes on the first cue.
A visible menu control: On / Off and language – do not rely on users knowing a keyboard shortcut.
Relative paths only – absolute C: leftovers are how living-room demos die. Watch case sensitivity when you author on Windows and test on Linux.
If the HTML path refuses local tracks (browser file:// security), fall back to the Windows Player path for that title or burn-in the primary language and keep soft files as a PC-only extra in a documented SUBS folder.
Accessibility without overclaiming
Browser-based disc UI means screen-reader behaviour and forced-narrative support will never match a certified Blu-ray player. Do the basics: high-contrast cues, sane reading speed, separate SDH when you can, and a menu label that says which language is active. Document on the package that subtitles are provided via the HTML/Windows playback path so buyers with exotic HTPC stacks know to test.
Legacy 8KDVD Maker accepted language codes plus SRT during its wizard; the modern Video File Maker + Menu Maker path expects you to integrate cues deliberately. When in doubt, follow the current authoring guide on 8kdvd.hddvd-revived.com, verify on both Windows Player and Chromium, and treat “works in VLC opened on the raw WebM” as a bonus – not the shipping definition of an 8KDVD subtitle.
8KDVD menus are HTML and JavaScript living on the disc, not a proprietary Blu-ray HDMV project. Menu Maker exists for authors who want control: background art, chapter entries, and – critically – buttons that switch between 8K, 4K, HD, and optional 3D bitstreams without leaving the launcher. Get the links wrong and users will swear the format is broken when you simply advertised a file you never encoded.
What Menu Maker produces
The tool builds the navigation layer consumed by the Universal Web Launcher and the Windows Player. Output is a menu folder: HTML entry points, assets, and wiring to your Video File Maker tiers. Smoke-test that folder in Chromium on the hard drive. If the menu fails locally, burning will not fix it.
Build workflow
Clone or download 8KDVD-Menu-Maker from GitHub.
Point it at the encoded video tiers from Video File Maker (HQ Plus / HQ / Standard / LP outputs as applicable).
Set background art – stills around 3500 px wide or wider keep large displays from looking soft.
Enter title text and button labels your audience will understand (“Play 4K”, not internal filenames).
Enable only the resolution variants you actually produced. No 8K button without an 8K file.
Add chapter names that match real access points in the encode when the menu supports them.
Export the menu folder into the disc structure beside the media files.
Open the menu HTML in Chromium; click every button once.
Wrap with ImgBurn as UDF 2.60 or drop the folder into your ISO build.
Resolution switching without surprises
Multi-resolution discs are the format’s everyday flexibility: one red case, several decode targets. The menu is the contract. If Standard encode only produced 4K and HD for a long feature, the 8K button should stay off. Conversely, a short HQ Plus demo may ship 8K + 4K and omit LP entirely. Document the available tiers on the packaging back so retail browsers know what the plastic contains.
Design habits that save support mail
Keep the first screen sparse: Play, Resolutions, Chapters, Credits.
Use high-contrast text over busy key art; living-room viewing distance is not a desktop.
Test HDR titles with the Windows HDR path and SDR titles with HDR off – menu chrome should remain readable either way.
Ship launchers for the platforms you claim; do not bury index.html five folders deep without a starter.
Browser reality check
Because navigation is web tech, behaviour tracks Chromium more than a Hollywood player SoC. Local file permissions, autoplay policies, and GPU decode limits all show up as “menu bugs.” Prefer the Windows Player for demos; keep the HTML path as the cross-platform fallback (Windows, macOS, Linux, Android). Watch the master tutorial linked from the official authoring guide when the UI fields feel opaque – fifteen minutes of that footage beats guessing button IDs.
When something misbehaves, isolate layers: broken art path vs wrong media URL vs player chrome. Swap in a plain coloured background; if buttons suddenly work, your asset path was wrong. If Play still fails, the menu is fine and the bitstream path is not. Keep a known-good sample ISO from the project site as a control disc so you can tell “my menu” from “this PC cannot decode VP9 at 8K.”
Downloads and the living authoring guide are on 8kdvd.hddvd-revived.com. Menu Maker is half the modern toolchain; pair it with Video File Maker and only then argue about box art.
Your first 8KDVD should be boring on purpose: one title, one language, one encode profile, a short menu, then a verified burn. The modern pipeline is Video File Maker → Menu Maker → UDF 2.60 image/burn. Skip the legacy all-in-one wizard unless you are reproducing an old demo.
What you need on the bench
Source master: full-resolution SOURCE.mp4 (7680×4320 when you truly have 8K). Keep HDR10 metadata if the project is HDR.
Video File Maker (V1.0.1 HDR or current GitHub release) with hundreds of GB free on a fast internal drive.
Menu Maker for the HTML navigation layer.
ImgBurn (or equivalent) set to UDF revision 2.60.
Blank BD-R 25 GB / 50 GB, or BD-XL if capacity planning says so – and a burner that can write them.
Windows Player plus a Chromium browser for smoke tests.
Step 1 – Pick a profile before you encode
HQ Plus, HQ, Standard, and LP are capacity contracts, not quality slogans. For a first disc, Standard is the sensible default if you are aiming at a ~100-minute feature on 50 GB-class media. HQ Plus suits short premium 8K demos; LP is for packing longer programmes onto 25 GB. Decide once; do not mix “HQ Plus menu copy” with an LP bitstream.
Step 2 – Encode with Video File Maker
Extract Video File Maker where the batches can write large intermediates.
Place your master where the scripts expect it (follow the release README / authoring guide naming).
Run the SDR or HDR batch that matches your master – do not run HDR scripts on plain SDR hoping for magic.
Optional: prepare anaglyph Source3D.mp4 only if you will ship a 3D menu button.
Confirm outputs are VP9 Profile 2 with Opus as required by the format body of standards.
Step 3 – Build menus
Point Menu Maker at the encoded tiers. Set background art (wide stills work best), title text, and chapter labels. Enable 8K / 4K / HD / 3D links only for files that exist. Export the menu folder into the disc tree beside the media. Open the HTML in Chromium from the hard drive before you burn anything.
Step 4 – Assemble and burn
Collect menu HTML, media, and launchers into one disc root as the authoring guide describes.
In ImgBurn, create an image or write folders with filesystem UDF 2.60, recurse subdirectories, set a sensible volume label.
Burn BD-R/BD-XL at a conservative speed; enable verify.
Play the burn in the Windows Player, then again via the HTML launcher. Switch resolutions once each.
First-disc failure modes
Empty ISO / missing files: rebuild from the assembled folder with UDF 2.60; do not assume a wizard left a good image.
Menu advertises 8K, only HD plays: you linked a missing tier – re-export Menu Maker.
Encode finished, disc won’t fill: wrong profile for runtime; replan bitrate vs blank capacity.
Budget an evening for the first burn even if the encode finished overnight: folder assembly and UDF settings cause more failed discs than codecs. Full living documentation, downloads, and the official authoring guide sit on 8kdvd.hddvd-revived.com. Get one Standard disc working end-to-end before you chase multi-disc HQ Plus box sets.
8KDVD playback is a two-lane road: a Windows desktop player for the full experience, and an HTML/Chromium fallback that runs wherever you can open a local disc folder or mounted ISO. There is no consumer set-top “8KDVD deck” shipping as a mass product yet, so plan your watching setup around a PC, mini-PC, or Android device with enough GPU horsepower for VP9 Profile 2 at the resolution you pick in the menu.
Before you press Play
Use a Blu-ray-capable optical drive for pressed or burned BD-R/BD-XL media. A plain DVD burner will not read Blu-ray blanks.
Mount an ISO the same way you would any UDF volume, or copy the disc tree to a fast SSD if seek times on a flaky burner stall 8K streams.
Confirm the display can take the resolution you intend: 8K tiers need an 8K panel (or a downscaling path you trust); 4K and HD buttons are there for a reason.
Prefer a Chromium-based browser for the HTML launcher (Chrome, Edge, Chromium, Brave). Firefox may struggle with the same local media pipeline.
Windows Player (preferred path)
The Windows Player from the project’s GitHub releases is the first-class route: full-screen navigation, menu integration, and fewer browser security quirks around local file access. Install the current build, insert or mount the disc, and launch from the player rather than hunting for index.html by hand.
Install the latest Windows Player release.
Insert the 8KDVD or mount the ISO.
Open the title from the player UI so menus and resolution switches load as authored.
Pick 8K, 4K, HD, or 3D only if that button was enabled for real encodes on the disc.
If video stutters, drop one resolution step before blaming the burner – decode load usually beats optical throughput as the first culprit.
HTML / Chromium fallback
On macOS, Linux, Android, or a locked-down Windows box without the native app, open the disc’s HTML menu in a Chromium browser. Launchers shipped on the disc are meant to point you at that entry page. Treat it like a local website: allow local media if the browser prompts, keep the volume mounted while you watch, and avoid “Open with…” random media players that ignore the menu layer entirely.
Android playback needs a drive or a pre-copied folder tree the device can see; USB-OTG Blu-ray enclosures vary wildly – test with a short Standard or LP encode before committing an evening to an HQ Plus master.
Practical troubleshooting
Black menu, no video: wrong browser engine, or the volume unmounted mid-session.
8K button dead / wrong stream: that tier was never authored; use 4K/HD.
Audio dropouts: Opus decode is light; more often the drive is thrashing – copy to SSD and retry.
HDR looks flat: confirm the Windows HDR toggle and that the encode was an HDR batch from Video File Maker, not SDR.
Sample ISOs and player links live on 8kdvd.hddvd-revived.com. Smoke-test every burn on the same machine class your audience will use; “works on my edit PC” is not the same as “works on a fanless NUC with an external BD-XL.”
8KDVD is an offline ultra-high-definition disc format from HD DVD Revived. It stores feature video as VP9 Profile 2 with Opus audio on ordinary Blu-ray media imaged as UDF 2.60, and it drives navigation with HTML menus that open in a Chromium-class browser or the dedicated Windows player. Think of it as a physical carrier for 8K (and lower-resolution fallbacks), not a new laser standard and not a streaming app squeezed onto plastic.
What sits on the disc
A finished 8KDVD is a data disc: encoded WebM-style bitstreams, menu HTML/JavaScript, platform launchers, and artwork assets laid out so a PC or Android box can mount the volume and start the menu. The volume format is UDF 2.60 – the same family Blu-ray authoring tools already know – so ImgBurn and similar burners can write 25 GB or 50 GB BD-R, or larger BD-XL blanks when the project needs the headroom.
Video: VP9 Profile 2 (SDR or HDR10 batches from Video File Maker).
Audio: Opus, muxed with the video tier.
UI: browser-based menus built in Menu Maker, with resolution switches (8K / 4K / HD / optional 3D) when those tiers exist.
Playback: Windows app first; HTML/Chromium fallback on Windows, macOS, Linux, and Android.
Encode profiles in one line
Authoring targets four named profiles – HQ Plus, HQ, Standard, and LP – which trade bitrate and runtime against disc capacity. HQ Plus is the short premium 8K tier; Standard is the practical “feature film on 50 GB-class media” setting; LP packs longer programmes onto 25 GB blanks. Pick the profile before you encode; the menu should only advertise resolutions you actually built.
How it differs from Blu-ray and Ultra HD Blu-ray
Commercial Blu-ray and UHD Blu-ray use MPEG-family video, proprietary menu systems, and licensed player stacks. 8KDVD deliberately uses open codecs and a web menu layer so indie and remaster projects can ship without a Hollywood authoring suite. There is no dedicated living-room 8KDVD deck yet; the published path is the Windows player plus the HTML launcher. Hardware makers can integrate the same menu model later – the navigation was designed with that in mind – but today you plan for a PC, mini-PC, or Android player with a Blu-ray-capable drive (or a copied folder/ISO).
Physical presentation
Retail and demo titles use a red, DVD-sized case so the format reads at arm’s length on a shelf. Photoshop box templates and sample ISOs live on the official project site. Licensing for low-budget and free/CC work is intentionally light; check current terms on 8kdvd.hddvd-revived.com before you brand a commercial release.
Tool chain at a glance
Video File Maker – batch SDR/HDR encodes into the profile set.
Menu Maker – HTML navigation, chapters, resolution buttons.
ImgBurn (or equivalent) – UDF 2.60 image or burn; BD-XL when capacity demands it.
Windows Player / Chromium launcher – verify before you mail discs.
The older all-in-one 8KDVD Maker wizard still exists for demos, but new titles should follow Video File Maker → Menu Maker → ISO. For living docs, profiles, and downloads, start at the official 8KDVD site and work outward from the authoring guide rather than inventing a parallel workflow.