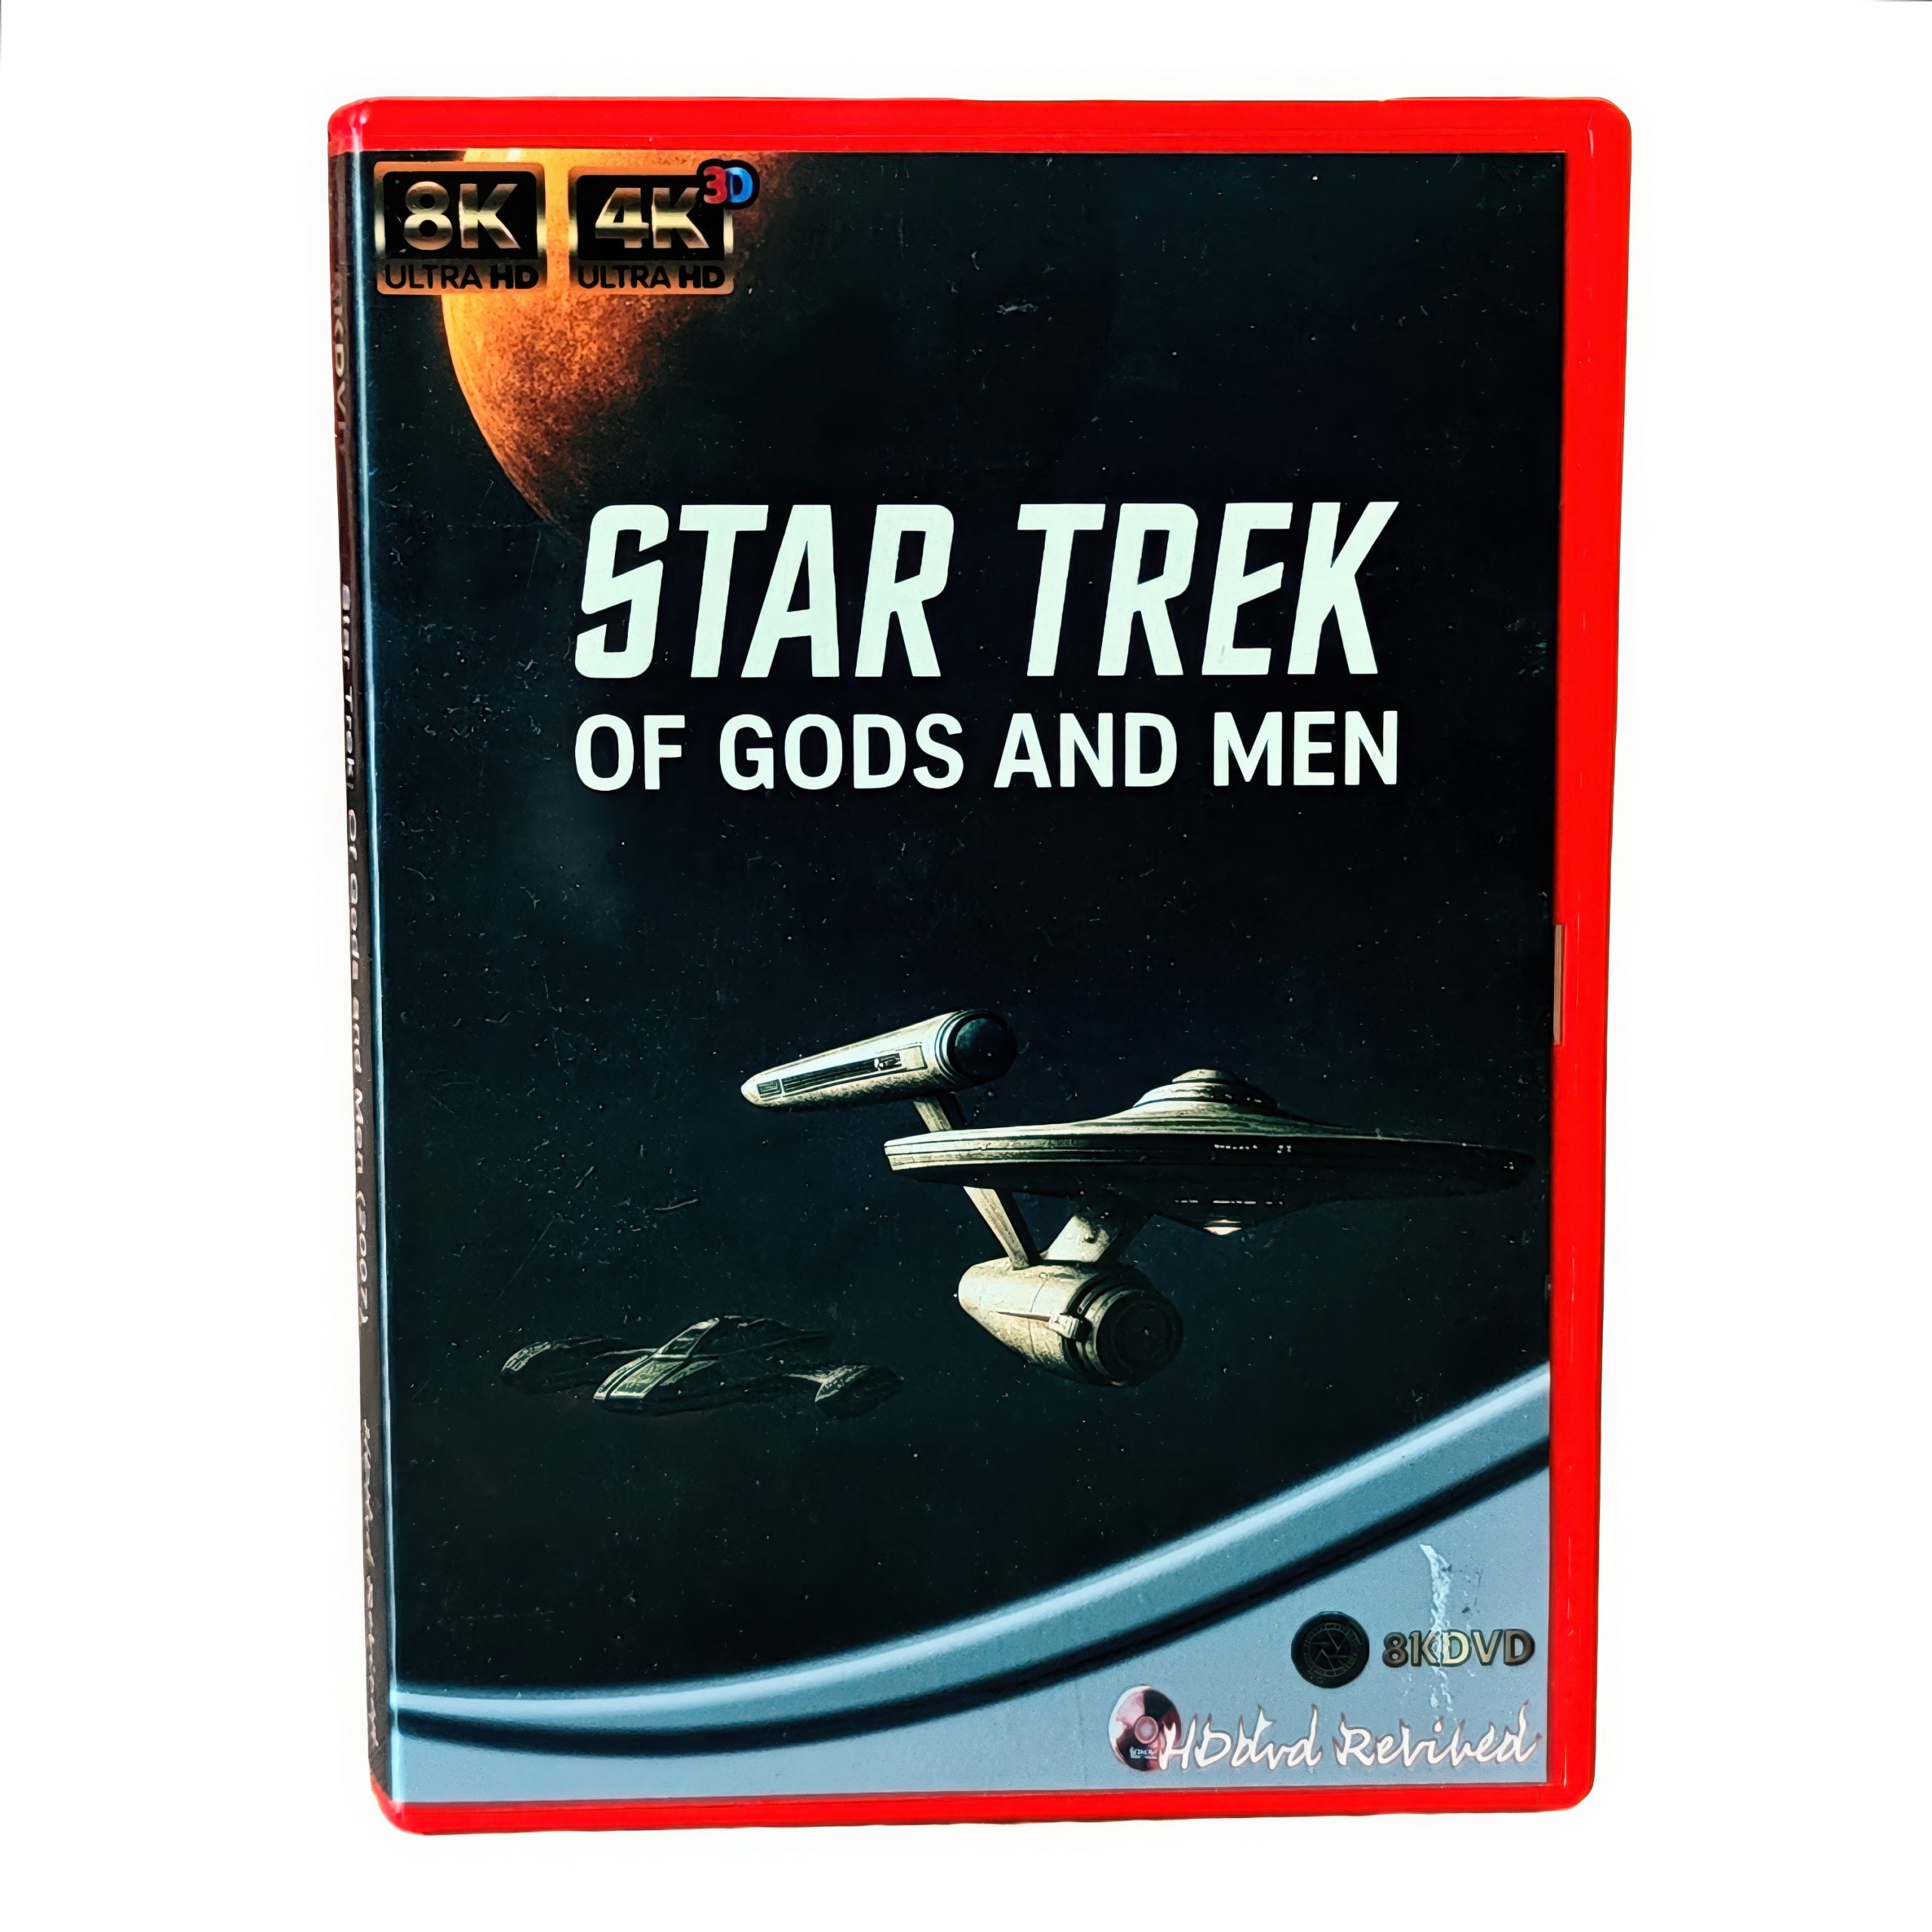
A corridor bulkhead fills the screen in a way Paramount’s lawyers once worried about – familiar geometry, slightly wrong proportions, love in every rivet. Then a face you half-recognise from syndication reruns walks into frame, older, game, committed. Star Trek: Of Gods and Men (2007) never pretended to be studio canon. It pretended, with fanatical care, to be Star Trek anyway.
Nichelle Nichols, Walter Koenig, Alan Ruck and a small constellation of franchise alumni orbit a story about power, exile, and the franchise’s favourite question: what happens when ideals meet force. Keep the synopsis short; the pleasure is not the twist, it is the fact the thing exists as a finished object rather than a Kickstarter apology.
On 8KDVD the production’s digital origins are impossible to miss – and oddly endearing. Sets that were built for web distribution suddenly have to withstand living-room scrutiny. Some surfaces hold. Some confess they were always set dressing. The disc does not lie for them, which is more respectful than soft focus ever was.
Franchise grammar, volunteer budget
What works, still, is performance energy and the show’s verbal DNA: moral argument dressed as adventure. Close-ups are kind to the veterans and slightly less kind to the CGI, which is fine; you came for the people who showed up unpaid, not for a ILM flex.
Sound design chases the classic Trek pulse – doors, consoles, that particular whoosh – with variable success. On a wide mix the score has room to be earnest without drowning dialogue. A few effects stages show their seams; treat them as production diary entries rather than defects.
Nichols and Koenig carry scenes with the unshowy authority of people who invented the grammar everyone else is quoting. Ruck’s presence adds a bridge between classic and later-era cadences without turning the piece into a reunion clip show. When the moral argument arrives – and it always does in Trek – the 8KDVD image is stable enough that you watch faces, not artefacts. That alone justifies the transfer for anyone who first saw this on a compressed web encode.
Fan film as physical media
Putting a fan production on 8KDVD is either a victory lap or a provocation depending on your temperament. I vote victory lap. The red case turns a download-era curiosity into something you can shelf next to licensed catalogue titles, which is exactly the sort of cheek this corner of fandom earned.
Menus are functional. Bitrate is generous through dialogue scenes; space exteriors show the expected digital artefacting when the original assets run out of resolution, and the encode wisely declines to invent detail that was never there.
Is it “real” Star Trek? Wrong question. It is a completed labour of affection, preserved at a scale that makes the affection visible in every costume seam. Eject, smile, argue about continuity with someone who still cares. That was always the point.
One more note for the pedants: yes, you can see the joins. Yes, some matte lines would make a studio QC bay flinch. Keep them. They are the fingerprints of a volunteer shipyard, and the red box is their dry dock.
A meeting-hall fluorescent tube buzzes into the opening shot like an unpaid extra. Plastic chairs, a folding table, someone already mid-sentence about a problem that will not stay local. A Town Solves a Problem begins in that register – civic, slightly comic, determined not to be epic – and the 8KDVD presentation has the good manners not to turn it into one.
The premise is deliberately modest: a community faces a practical mess, argues, improvises, and somehow arrives at a fix that feels earned rather than scripted from a binder. Characters talk over each other the way people do when the microphone is optional. That is nearly the whole synopsis, and it should stay that way.
What the ultra-wide encode reveals is texture that smaller releases flattened – the scuff marks on the hall floor, handwritten notes on a clipboard, weather on coats when the action spills outside. These are not “details for detail’s sake.” They are how the film insists it is happening somewhere specific.
Comedy of procedure
Much of the humour sits in process: agendas, side conversations, the person who brought the wrong tool and will not admit it. On a high-resolution disc you catch reaction shots that used to live in the soft edge of the frame – a raised eyebrow, a suppressed smile, the quiet vote happening in someone’s shoulders.
Audio is conversational and proud of it. Dialogue sits forward; room tone is honest. Through decent speakers you hear the difference between the hall’s hard surfaces and the outdoors without anyone having sweetened the mix into demo-disc territory. When someone finally laughs properly, it lands like relief, not a sitcom cue.
There is a temptation, with any civic comedy, to oversell “heart.” This film mostly declines. People are useful, irritating, intermittently kind. The camera stays at human height more often than not, which on a giant encode stops looking like a limitation and starts looking like a philosophy. You are in the room. The disc is not trying to levitate you above it.
Huge frame, small stakes – on purpose
Specialist formats often imply that bigger equals more important. This title argues the opposite. 8KDVD’s bitrate simply refuses to apologise for ordinary light. Daylight through the hall windows stays uneven. Night scenes keep their cheap practical lamps. Nobody has HDR-blasted the town into a tourism advert.
The case design is understated, almost stubbornly so, which fits. Playback is uneventful in the best sense: stable, clean, no encode hiccups during the talkier passages where compression usually chews faces.
I finished it wanting exactly nothing more from the plot and slightly more coffee. That is a compliment. Small stories look strange in red plastic until you remember that physical media was always supposed to host whatever you cared enough to keep – including a town that, for once, actually solves something.
Shelf it beside the louder catalogue titles and leave a gap. The gap is the joke: not every spinning disc owes you an explosion. Some only owe you a meeting that ends on time.
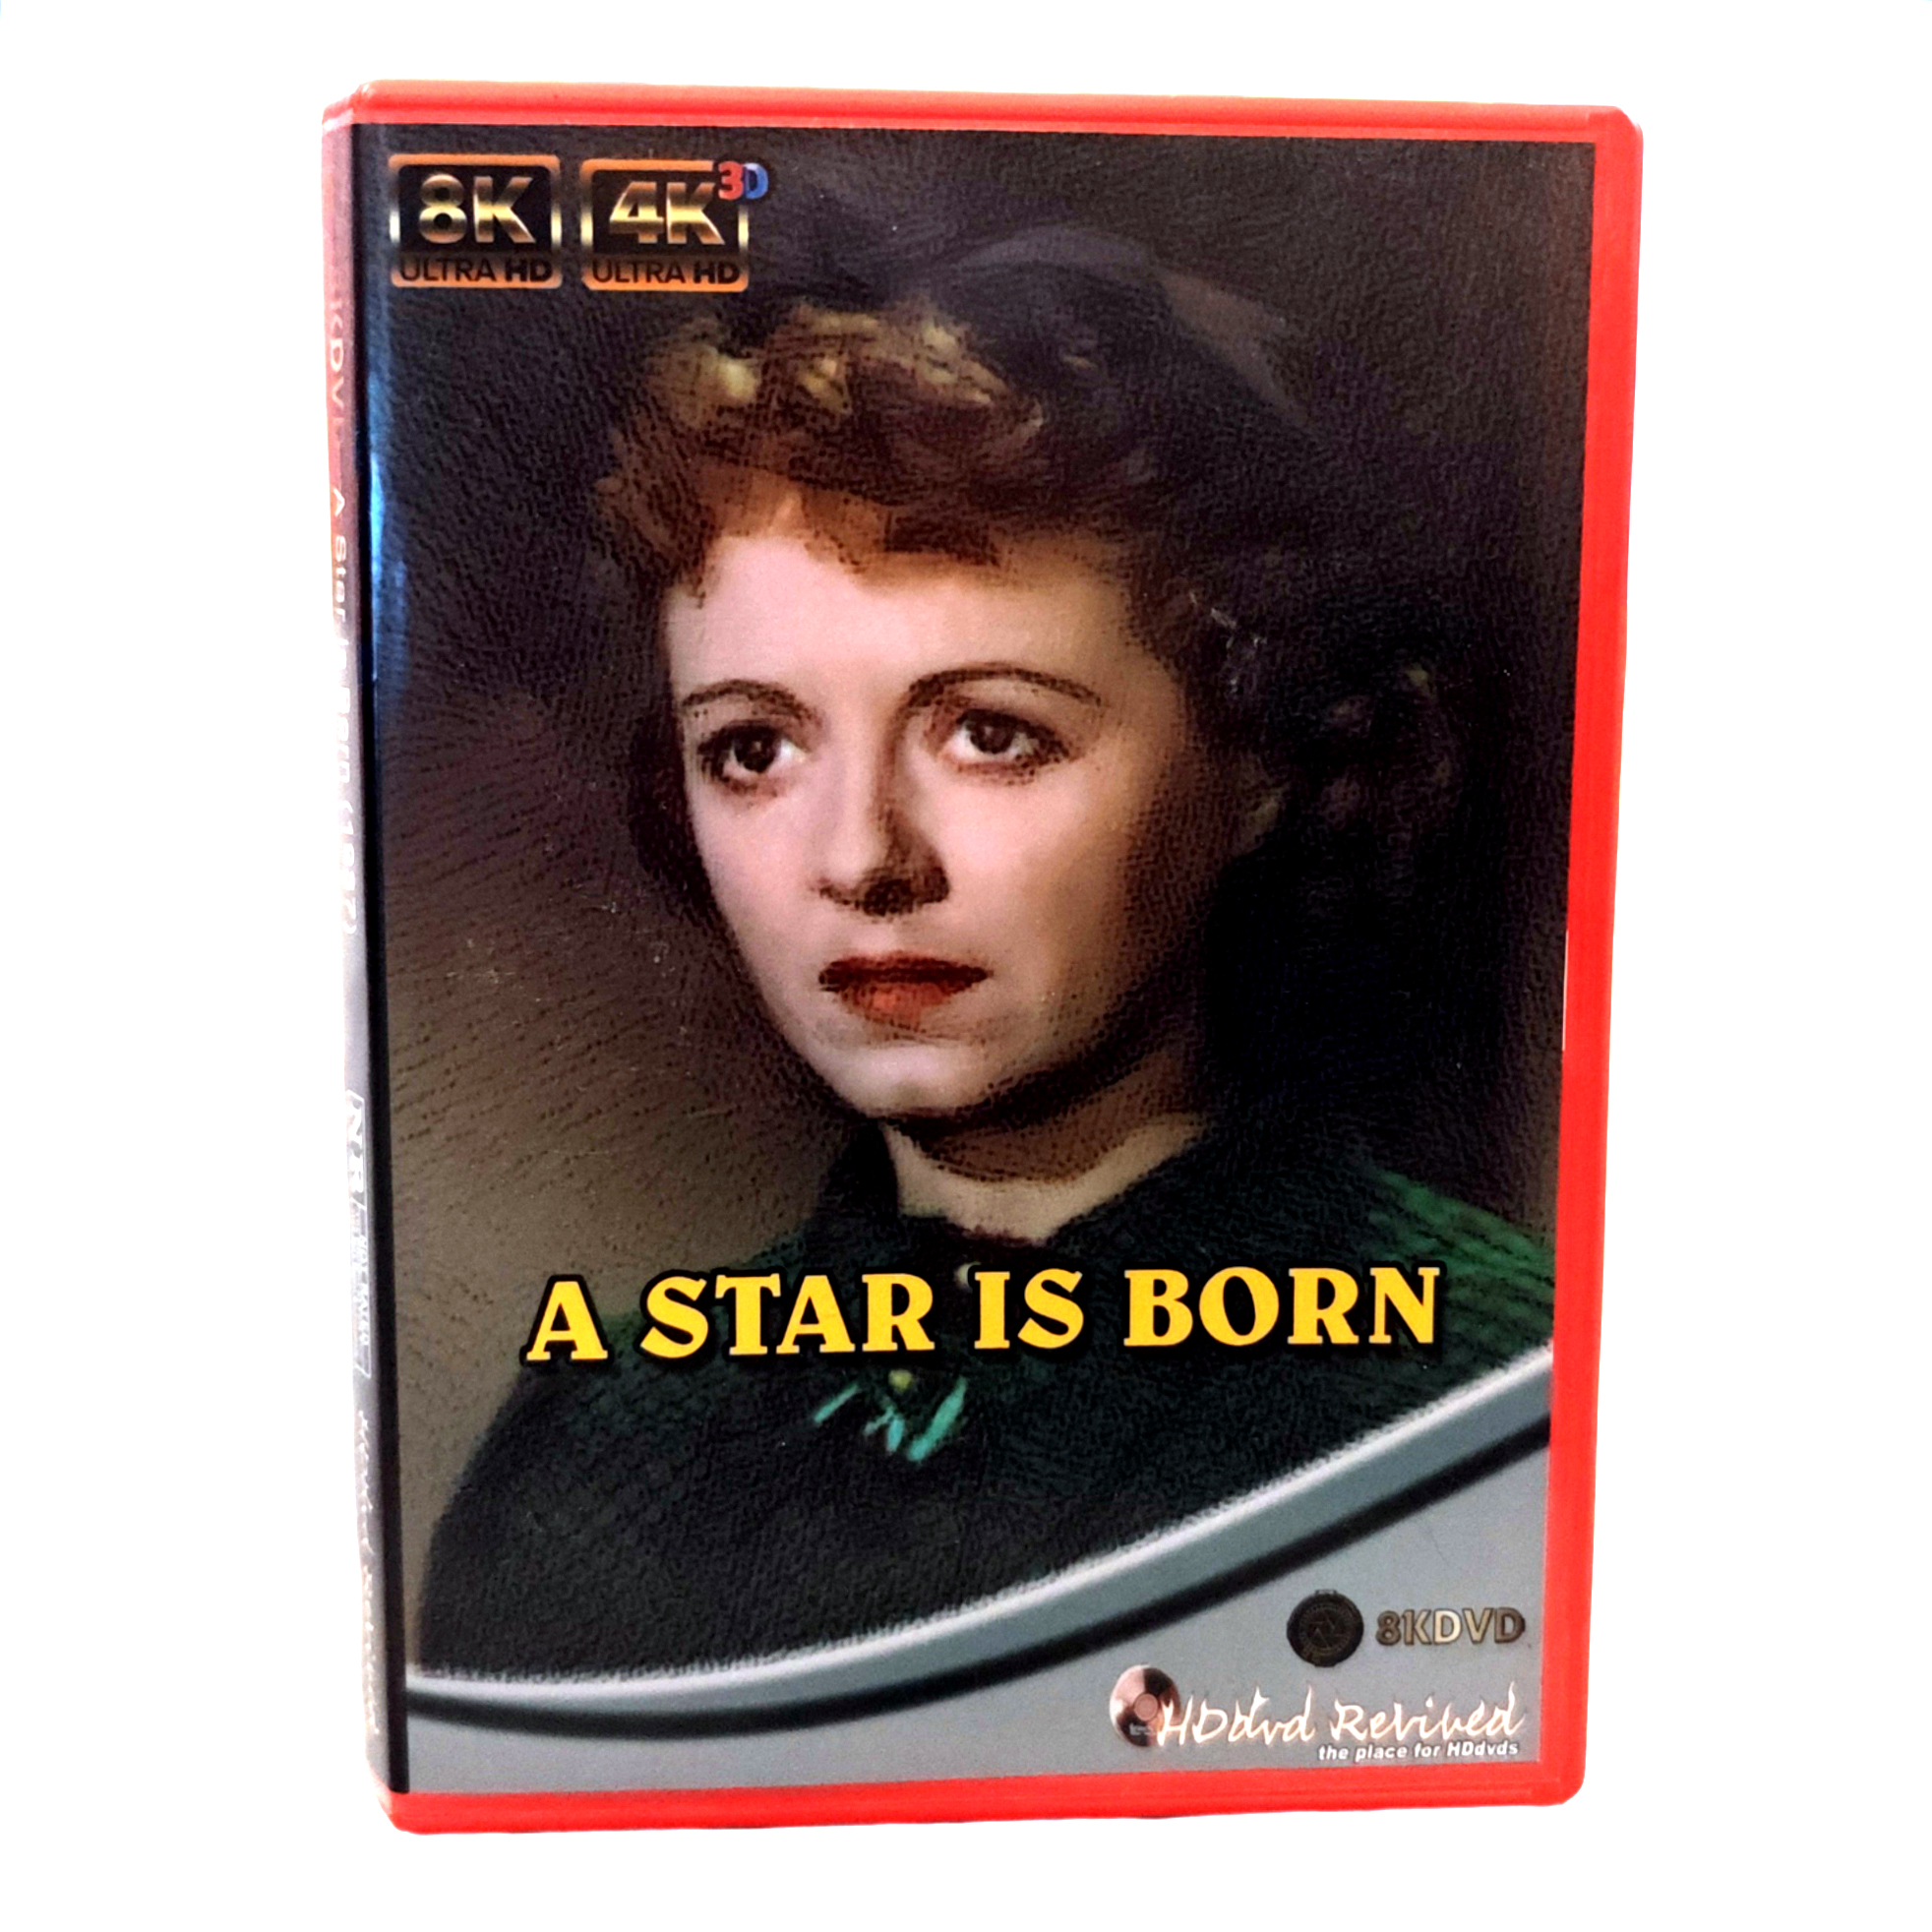
Judy’s eye-line hits the stage lights and the whole frame blooms – not a modern HDR party trick, just 1954 Technicolor doing what Technicolor does when you stop apologising for it. Sequins throw sparks. The orchestra pit becomes a trench of brass and shadow. A Star Is Born (the Cukor remake, Garland and James Mason) was always about glare: career glare, marital glare, the white heat of being watched.
Esther becomes Vicki. Norman Maine drinks, mentors, collapses. Hollywood eats one of them politely and the other with applause. You know the shape; three sentences is all the plot deserves here. What matters on disc is whether the musical numbers still feel dangerous rather than archival.
On 8KDVD they do. Fabric resolution in the “Born in a Trunk” sequence is almost indecent – you can count the stitches on costumes that were designed to read from a balcony, not a sofa two metres from an OLED. Skin tones hold warmth without tipping into peach syrup. Mason’s ruined charm survives extreme close-up; Garland’s performance has nowhere to hide and does not need to.
Soundstage as cathedral
The musical numbers benefit most from the format’s bandwidth. String sections separate. Chorus stacks stop being a single pink smear. When the film drops into quieter domestic scenes, the mix pulls back properly – you hear floorboards, ice in a glass, the awful quiet of a marriage running out of script.
There is a known history of cuts and restorations around this title; whatever master fed this encode, it looks supervised rather than automated. Grain structure stays filmic. No wax-face denoising. Nightclub reds are deep without clipping into a single digital plate.
Pay attention to how Cukor frames applause. Crowds are not a blur of extras; individual heads catch light, which makes the later silences louder. Mason’s Norman Maine is a study in charm eroding under magnification – the smile holds a fraction too long, the eyes go elsewhere. Garland meets the camera as if it owed her money and affection in equal measure. Ultra HD does not “improve” that; it simply stops getting in the way.
Glamour, boxed
The 8KDVD package sells old Hollywood without camp overload – a relief. Menu is ceremonial but short. Bitrate holds through the big production numbers; no macroblocking on the soft-focus close-ups that Cukor loved and modern codecs hate.
Watching it this large re-stages the film’s central cruelty: fame as a lighting problem. Esther steps into brilliance; Norman steps out of it. You can see both transitions in the catchlights now. That is not nostalgia. That is optics.
Physical media people will fuss about which cut this is and whether a missing number should haunt the chapter menu. Fair game for the sleevenotes. For the living room, what counts is that the big songs still feel like risks taken in front of an audience that might not clap. The disc’s bitrate keeps up with the choreography; the soft edges stay soft on purpose.
If you only know the later remakes, this one still has the sharper teeth. The red case feels almost too cheerful for the ending. Eject carefully. Then maybe put something quieter on, or do not – Hollywood rarely offered aftercare.
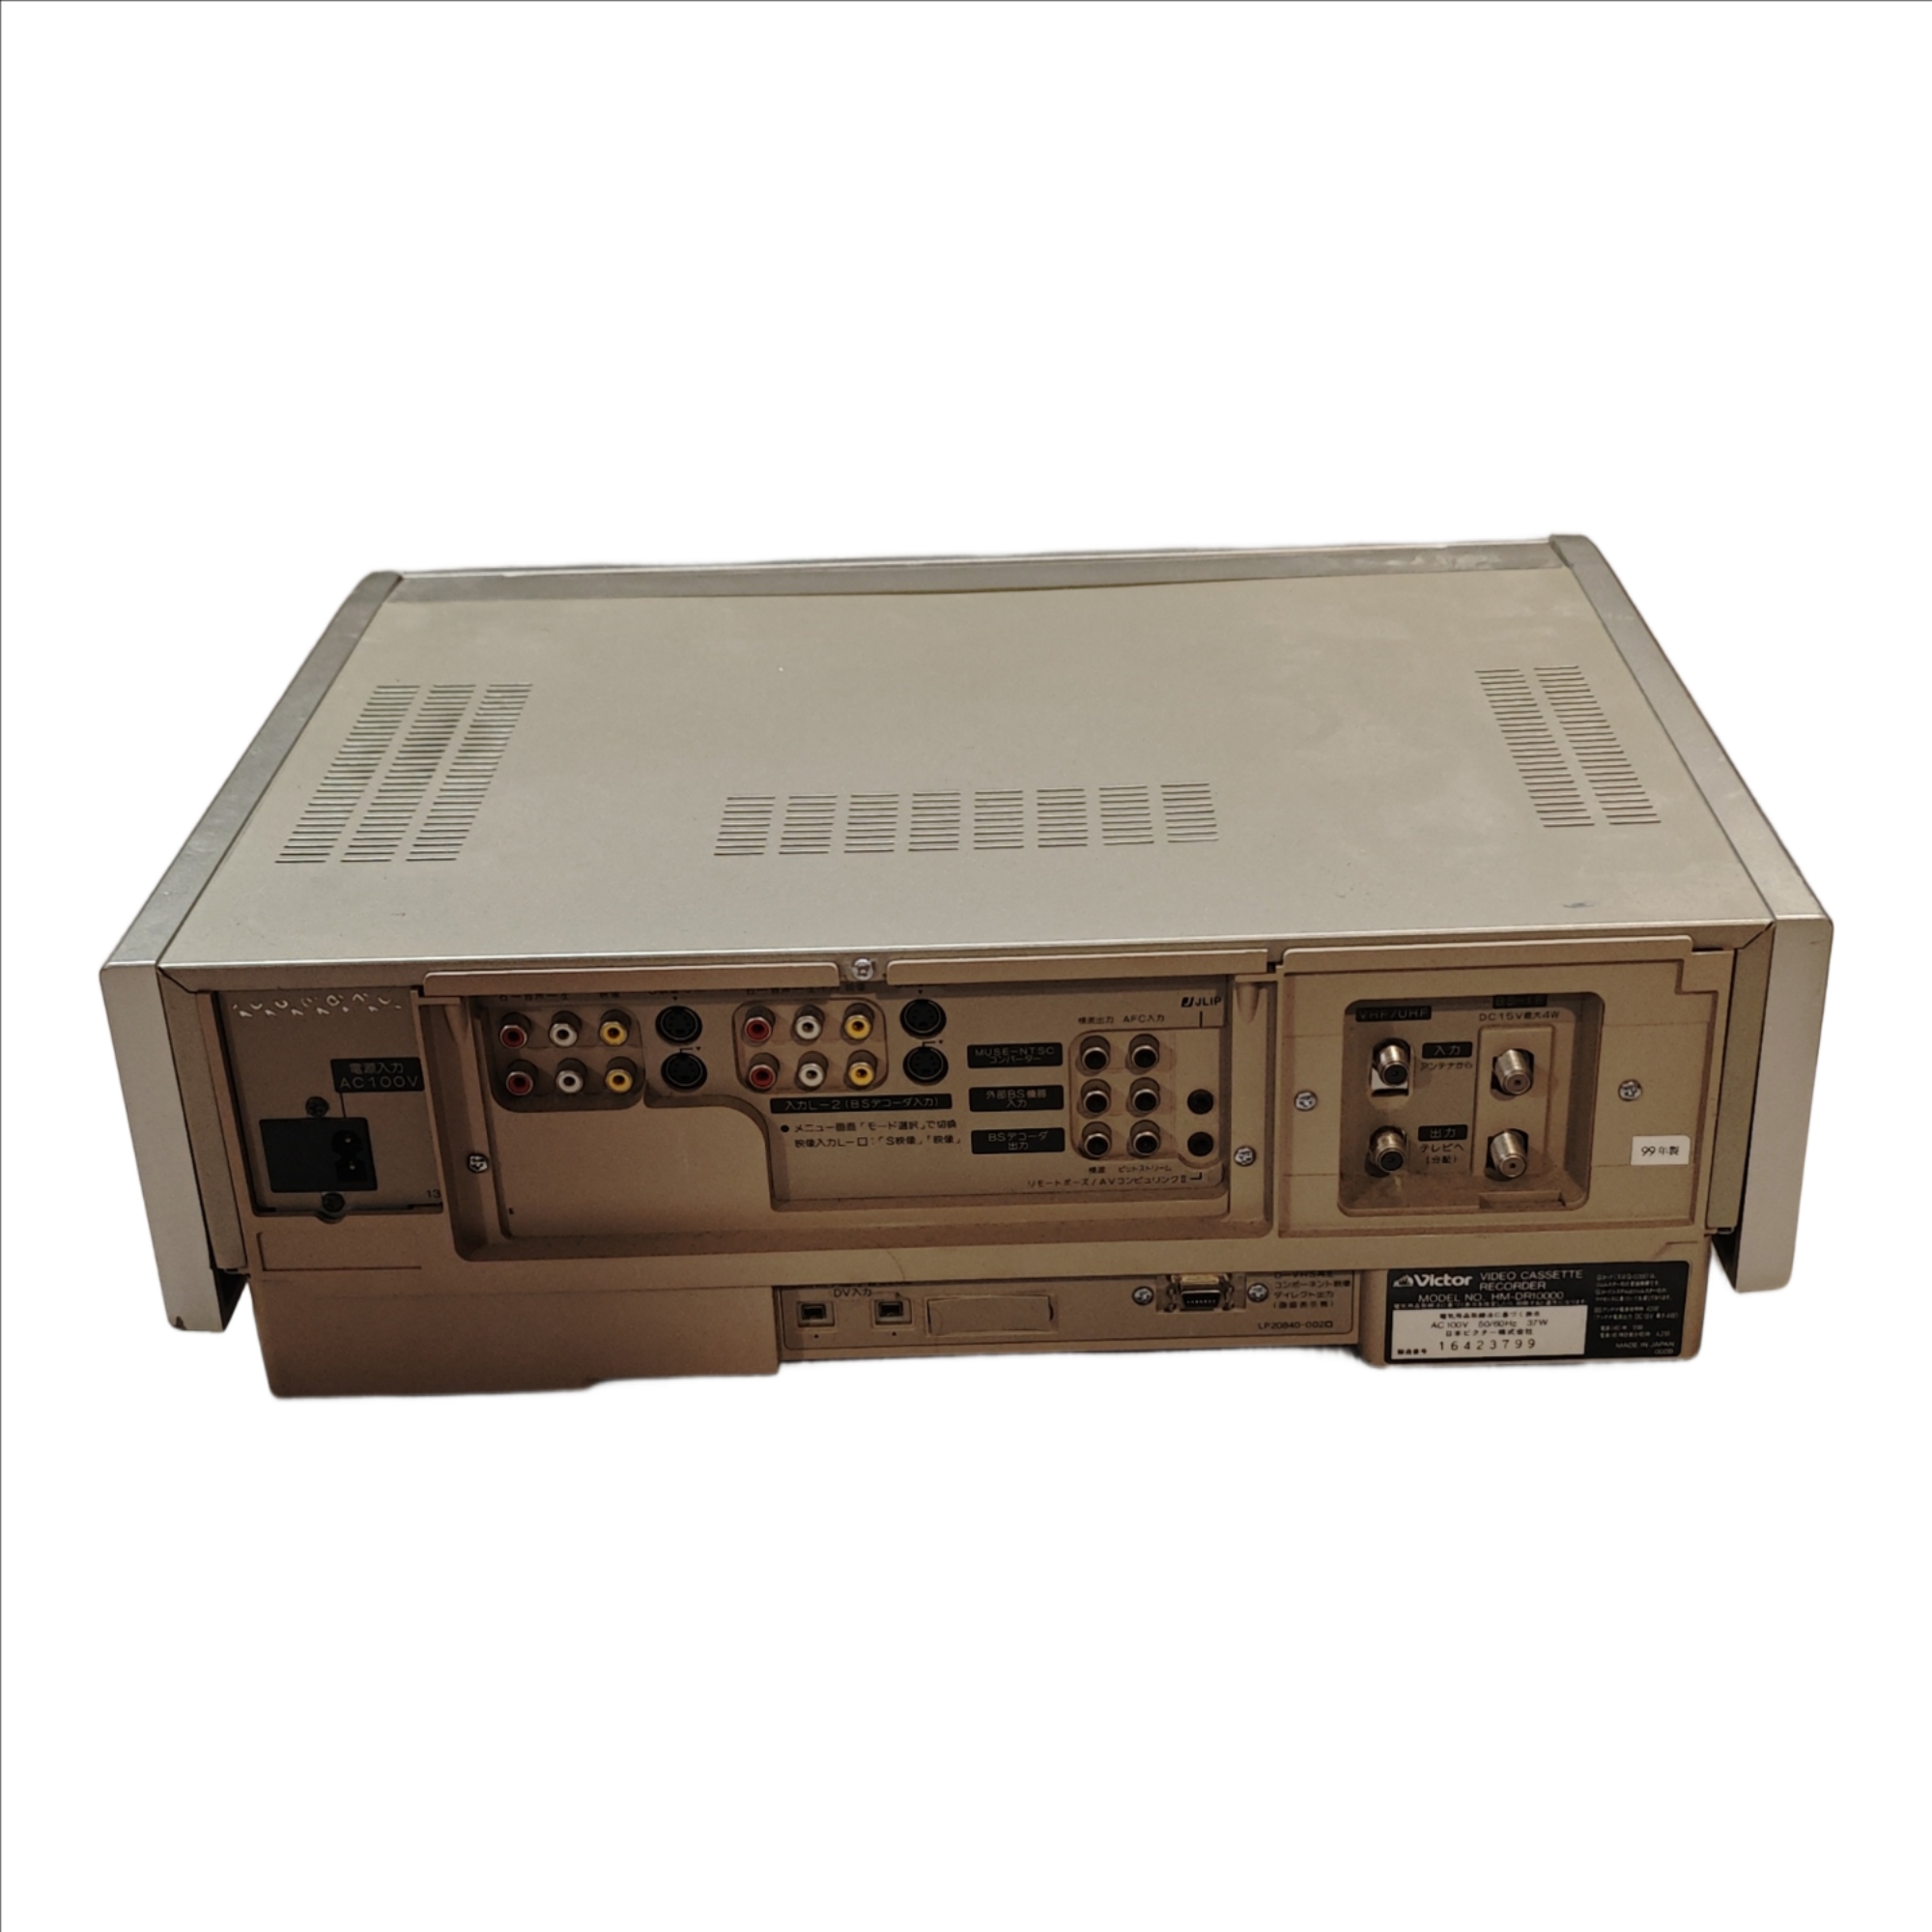
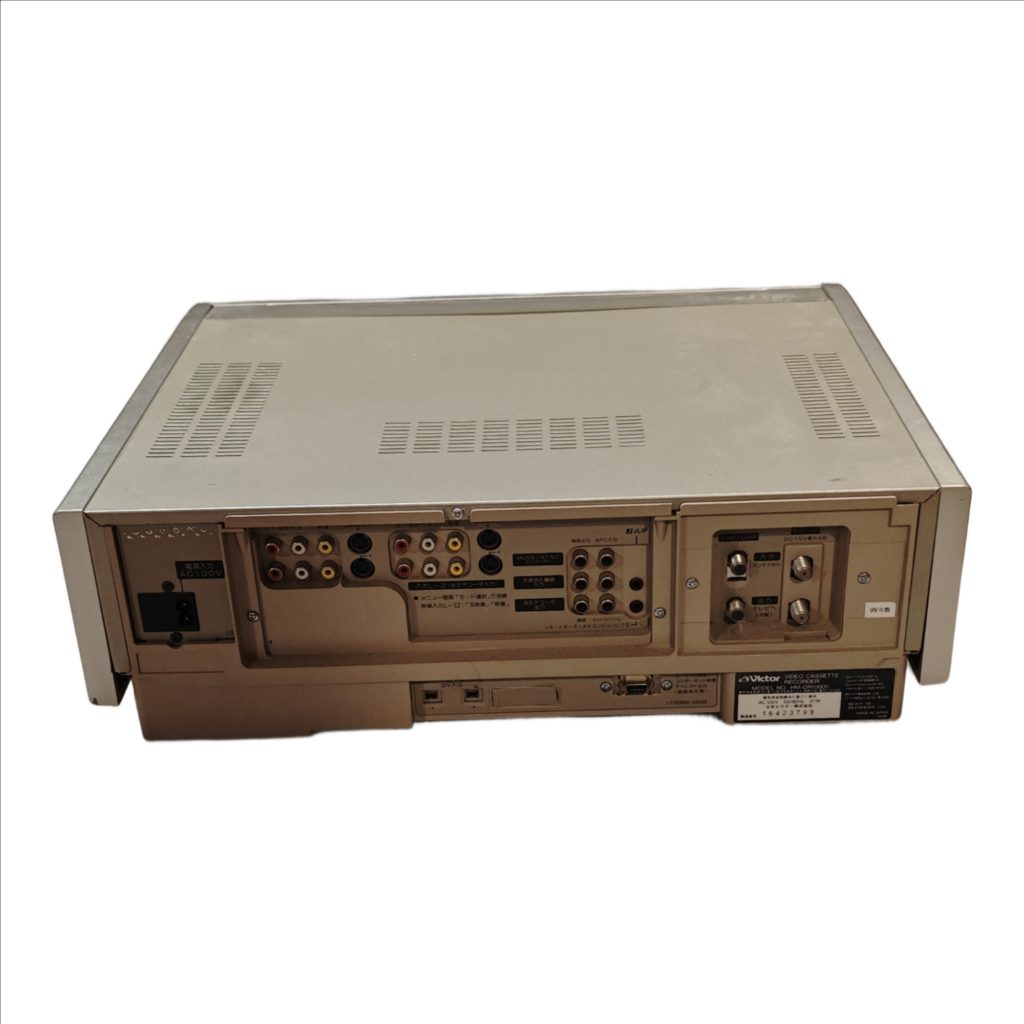
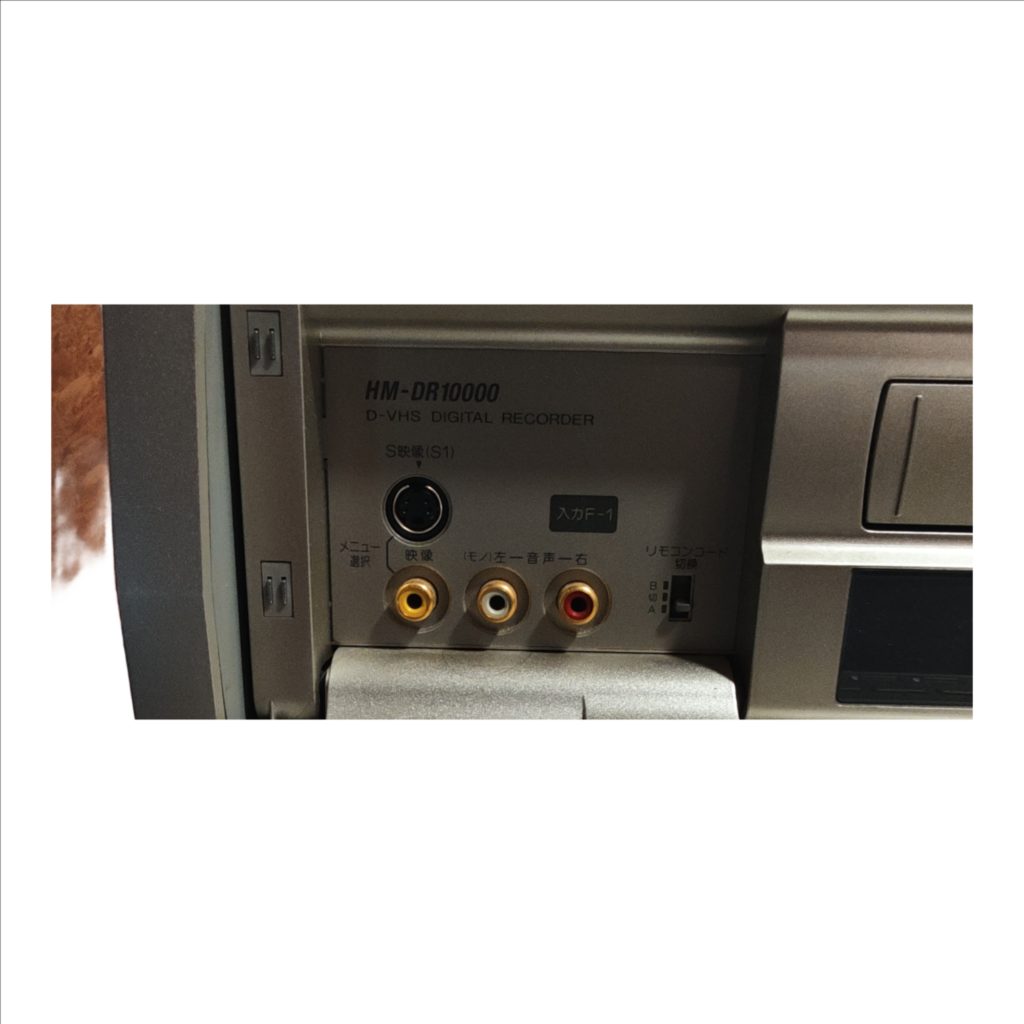
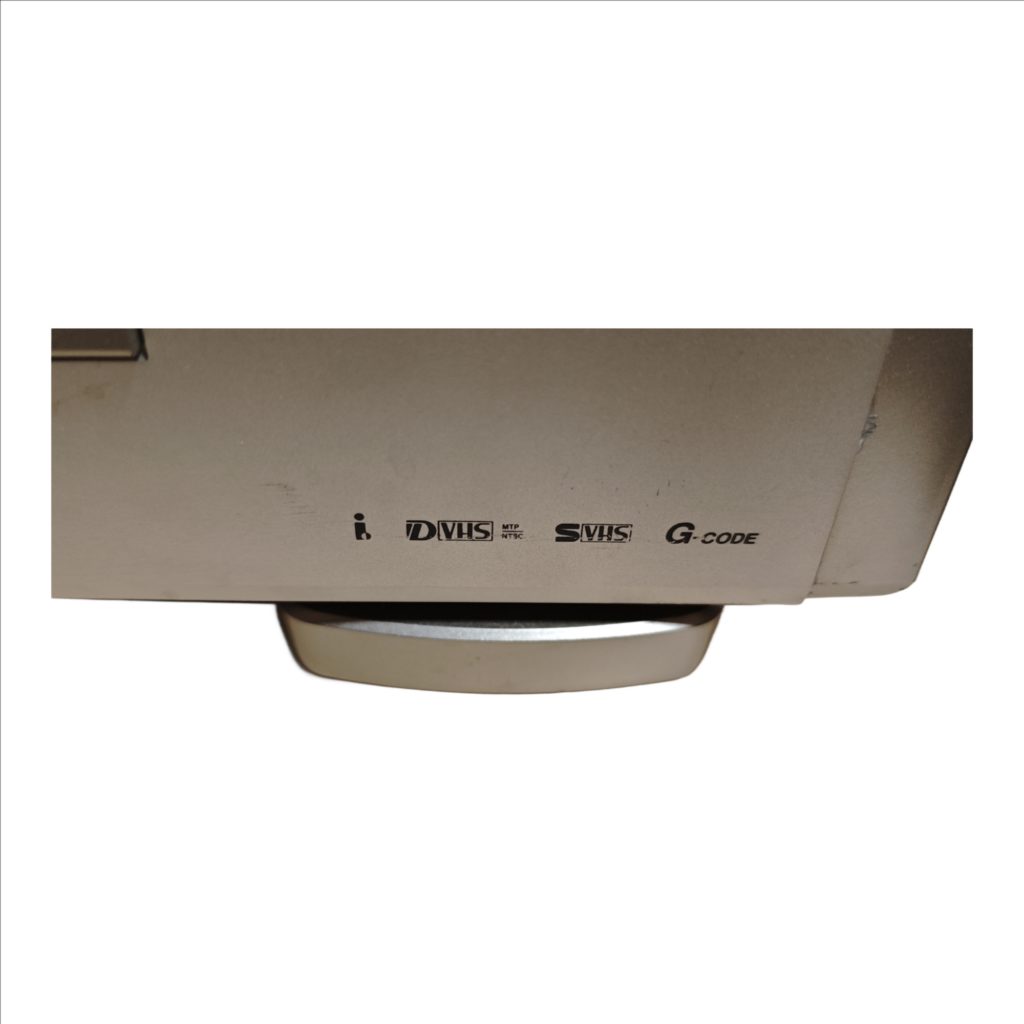
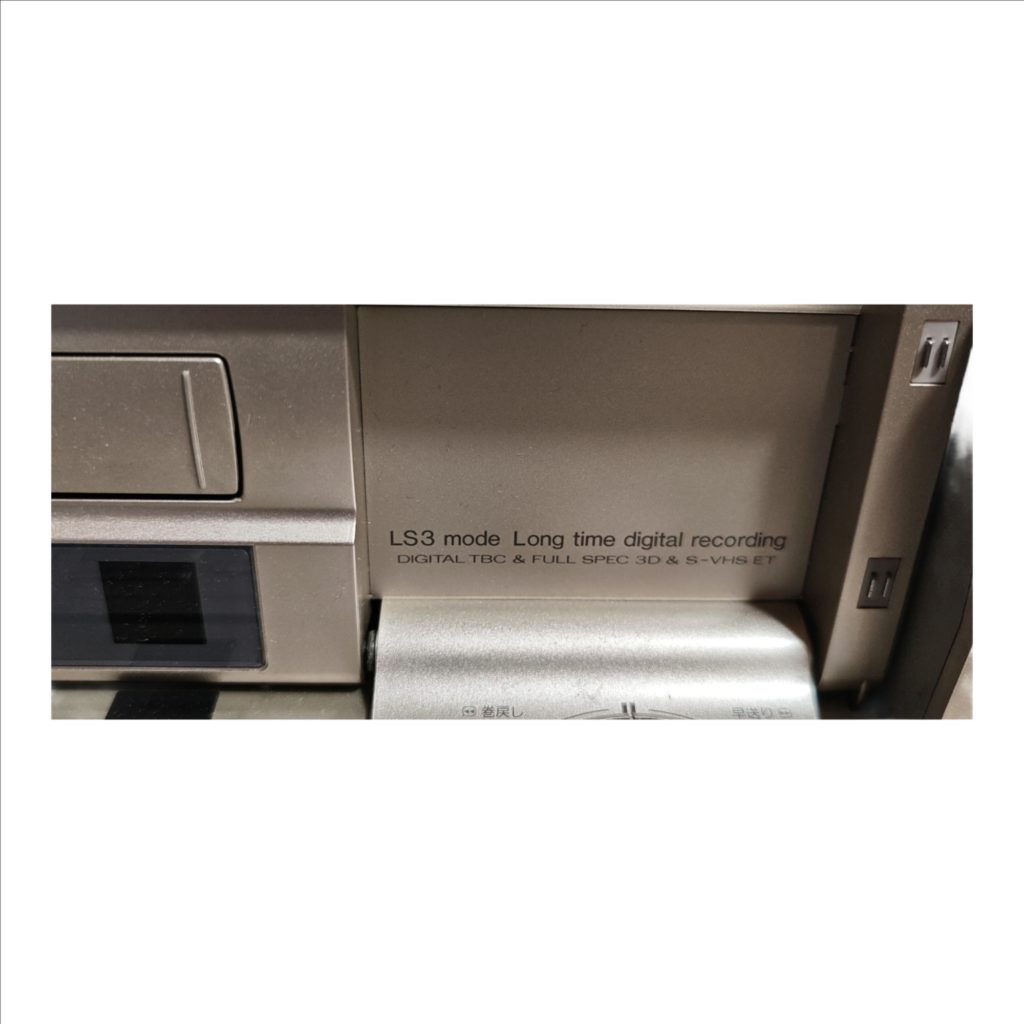
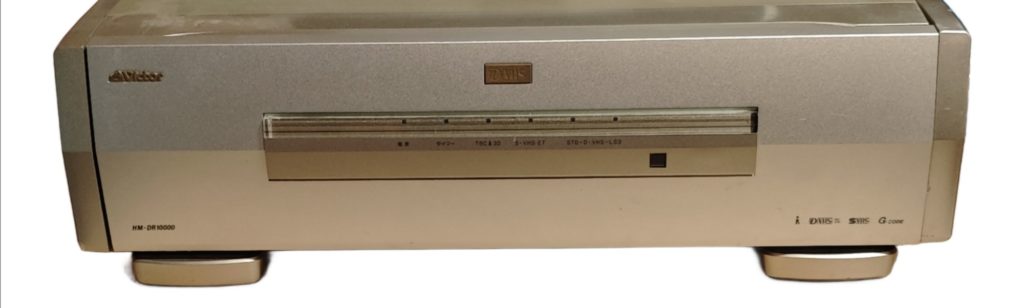
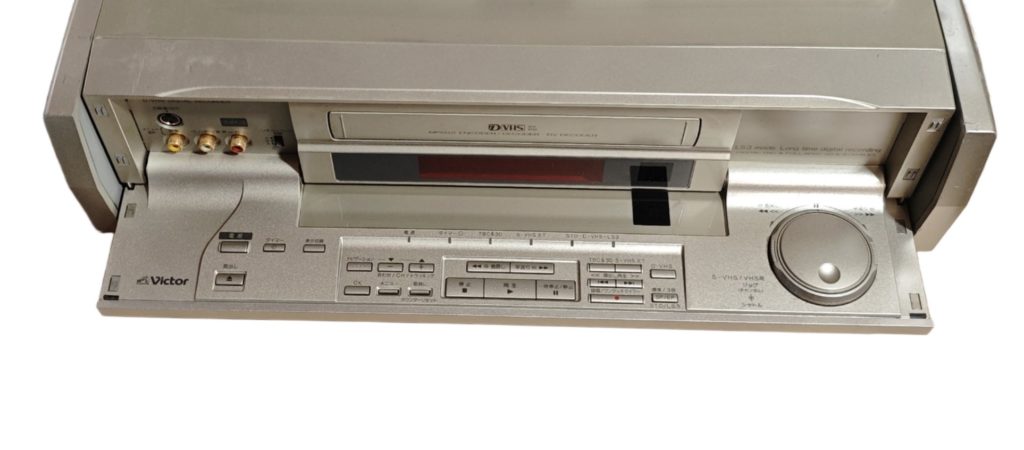
The Victor HM-DR10000 is a D-VHS deck that records and plays both analog VHS/S-VHS tapes and digital D-VHS tapes, with built-in MPEG-2 processing, digital TBC/3D-NR, S-VHS ET, and selectable speeds including STD and LS3 for long-play. A flip-down front door provides quick-connect F-1 inputs (S-Video, composite, L/R audio) and full transport/navigation controls with a jog/shuttle for precise search, while the rear panel offers permanent A/V inputs/outputs (composite, S-Video, stereo audio), RF antenna loop-through, BS-IF pass-through, a D1 video output, and an AC100V mains inlet for fixed installation.
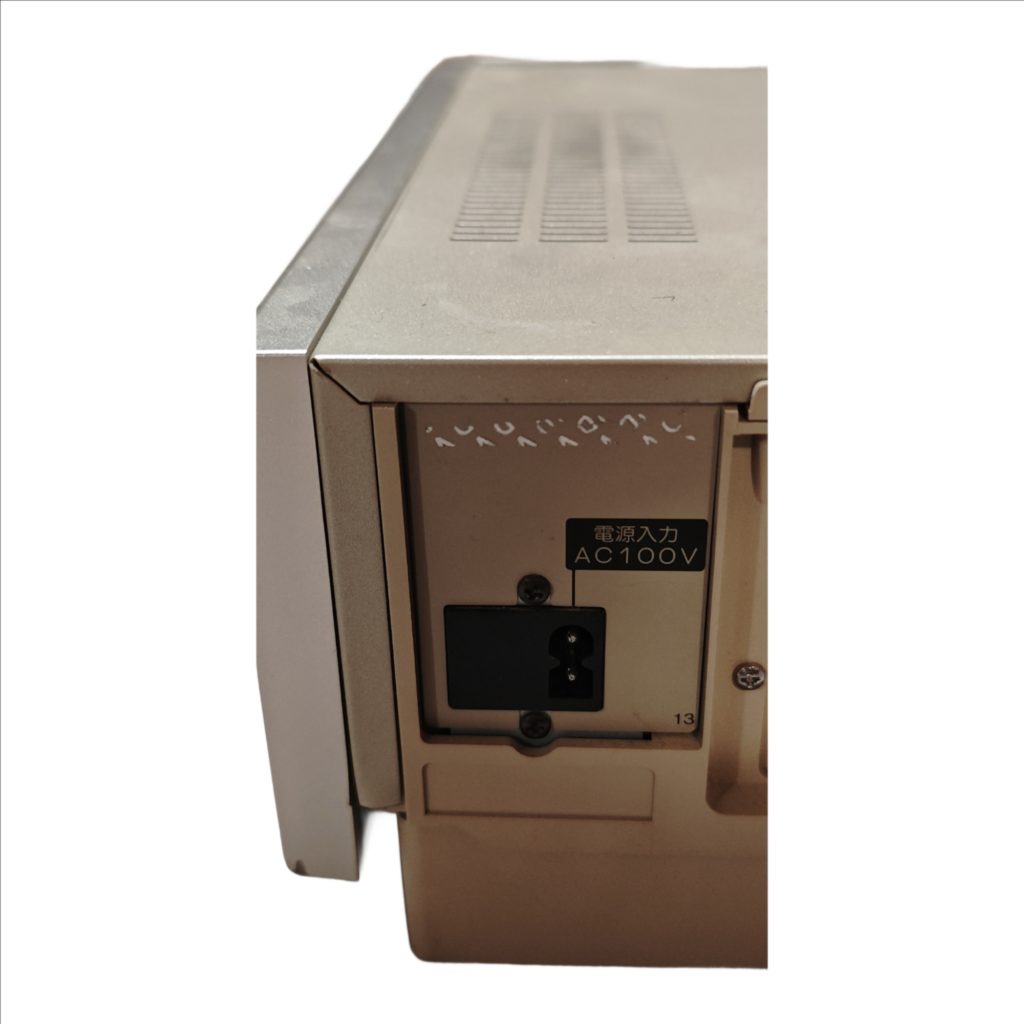
The rear of the Victor HM-DR10000 is the permanent-hookup side: mains power, baseband A/V I/O, RF loop-through, and a D1 video connector. Use the front flap for quick, temporary sources; use the rear for your TV/receiver, capture device, and antenna/satellite pass-through.
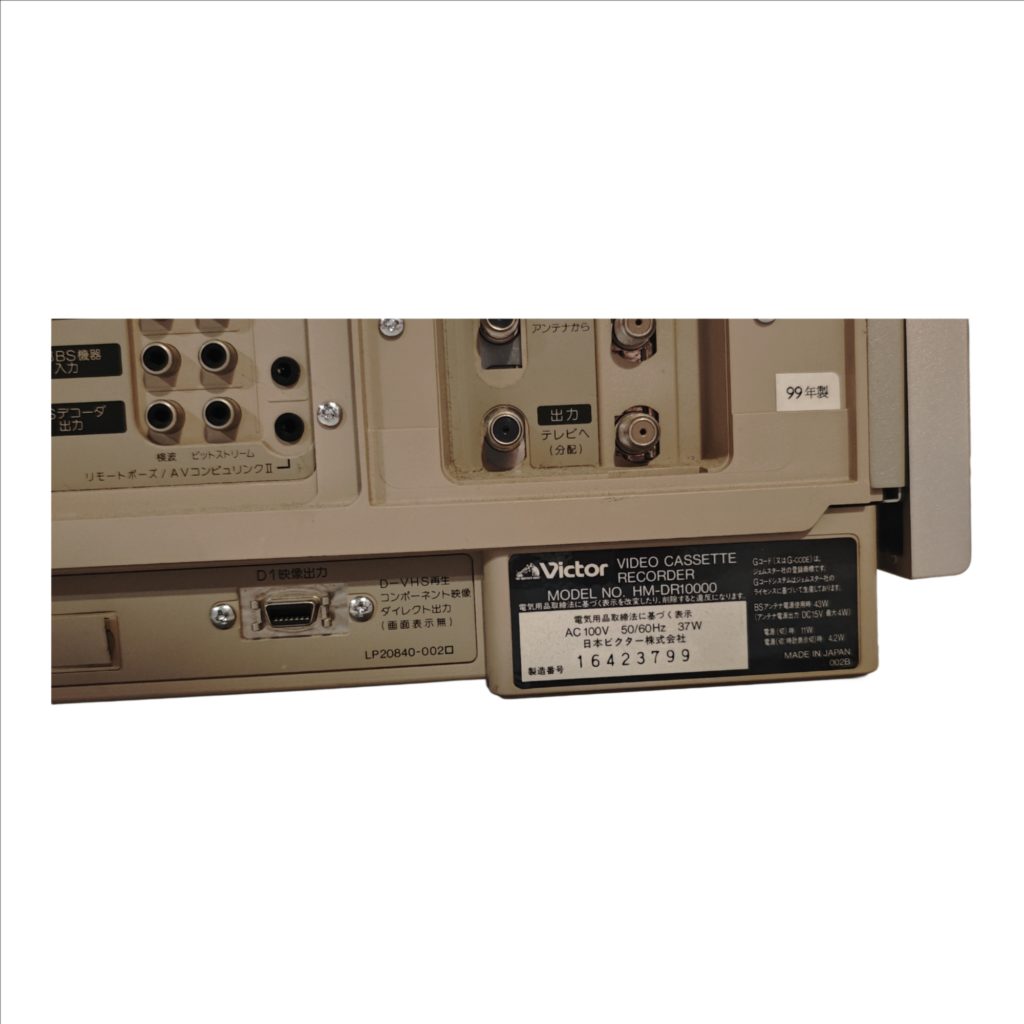
Power Inlet (電源入力 AC100V)
The rectangular socket labeled 電源入力 AC100V is the mains inlet. It accepts the deck’s two-pin Japan-market power lead. It carries power only. If your wall supply is not 100 V AC, use a suitable step-down before this inlet. The front Power button controls on/off once the cord is connected.
Composite Video Output (映像 出力・黄色)
The yellow RCA jack marked 映像 in the 出力 group sends standard-definition interlaced video. It carries 480i for NTSC sources (this deck’s native system). It does not carry audio. Use this when your TV or capture device lacks S-Video or D-terminal. Picture quality is lower than S-Video because color and brightness are combined.
Stereo Audio Outputs (音声 出力 左=白/右=赤)
The white and red RCA jacks in the 出力 group send analog line-level stereo. They carry sound only. Pair them with either Composite Output, S-Video Output, or D1 Output for a complete A/V connection to a TV, receiver, or capture device.
S-Video Output (S映像 出力)
The round mini-DIN labeled S映像 in the 出力 group sends standard-definition interlaced video with luma and chroma separated. It carries 480i. It does not carry audio. Use S-Video plus the white/red audio outputs for the cleanest analog SD picture when your display or capture device supports S-Video.
Composite Video Input (映像 入力・黄色)
The yellow RCA jack in the 入力 group receives standard-definition interlaced video from another device for recording. It accepts 480i. It does not accept audio. Use it when your source has only composite video.
Stereo Audio Inputs (音声 入力 左=白/右=赤)
The white and red RCA jacks in the 入力 group receive analog line-level stereo from a source you want to record. They carry sound only. Always connect these alongside Composite Input or S-Video Input when making an analog recording.
S-Video Input (S映像 入力)
The round mini-DIN labeled S映像 in the 入力 group receives standard-definition interlaced video for recording. It accepts 480i. It does not accept audio. Use it with the white/red audio inputs from the same source for the best analog recording quality.
D-Terminal Video Output (D1信号出力)
The thin blade-style jack labeled D1信号出力 is a Japanese D-terminal. “D1” denotes 480i component-style analog video. It carries video only, no audio. Use it when your display or scaler has a D-terminal input or an appropriate D-to-component (Y/Pb/Pr) cable. It does not output 480p/720p/1080i; it is strictly SD interlaced.
i.LINK / IEEE1394 / FireWire Ports (i.LINK)
The two small square i.LINK ports are IEEE1394. They carry digital data streams, not analog audio/video. They support DV camcorders (DV25 at 480i/576i, depending on the cam) and MPEG-2 transport streams between D-VHS decks and compatible digital tuners. Use i.LINK to record or play digital sources at native resolution and bitrate. When an HD broadcast is recorded via i.LINK, full resolution remains on tape and is available again over i.LINK; the deck’s analog outputs still display standard-definition during playback.
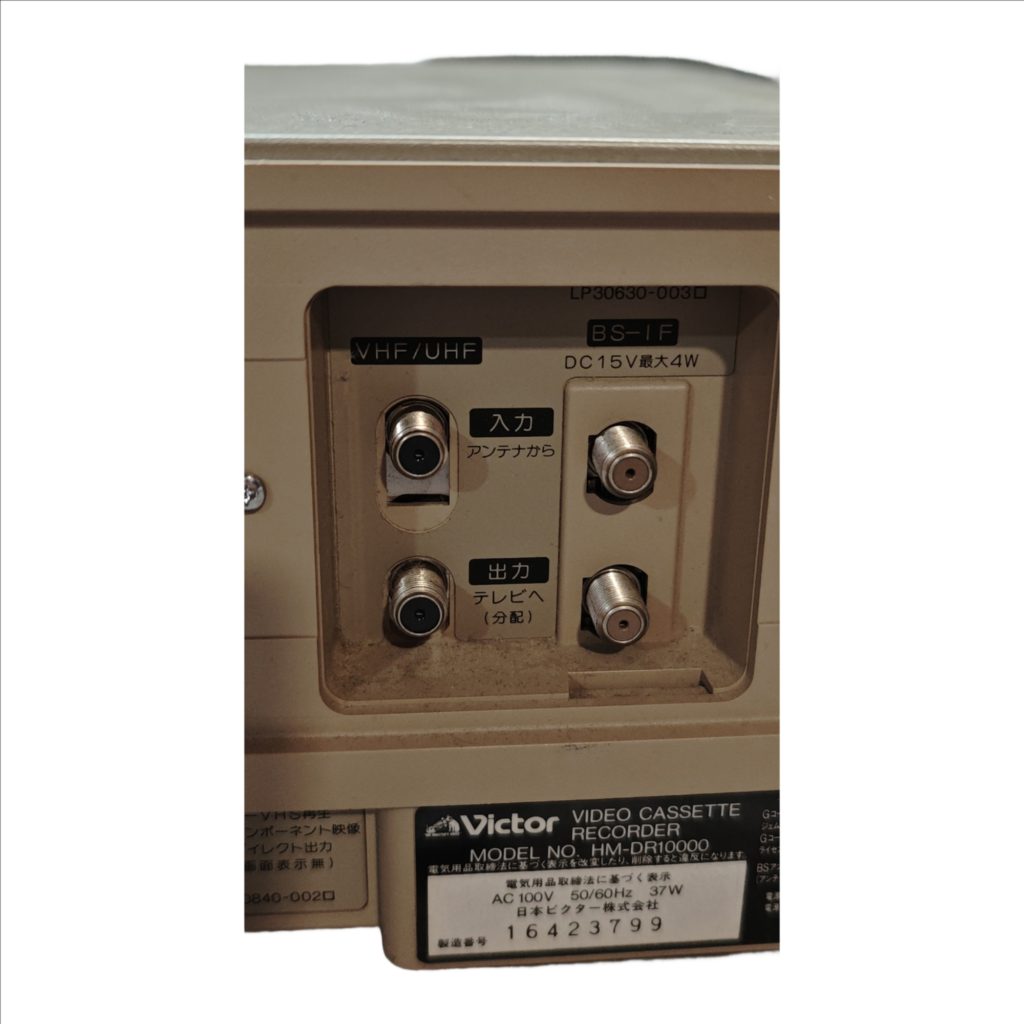
RF Terrestrial Pass-Through (VHF/UHF 入力/出力)
The pair of threaded F-type jacks labeled VHF/UHF are a loop-through for a rooftop or indoor antenna. 入力(アンテナから) is the antenna feed in. 出力(テレビへ/分配) passes that same RF on to the TV or a splitter. These are not audio/video jacks for your tape playback; they exist so your TV’s tuner still sees broadcast signals with the VCR in line.
Satellite IF Pass-Through (BS-IF DC15V 最大4W)
The adjacent pair of F-type jacks marked BS-IF provide a through-path for a satellite intermediate-frequency feed. The label DC15V 最大4W indicates the path can pass up to 15 V at 4 W to power an inline satellite device. They do not output the VCR’s picture or sound and are not used for capturing or watching tapes.
Control Ports (リモートポーズ/AVコンセントリンク)
The small control mini-jacks near the A/V cluster are low-voltage control lines for compatible Victor/JVC equipment. They start/stop the deck for synchronized dubbing. They do not carry audio or video and are not for headphones or microphones.
What Each Connection Lets You Record
Composite Input and S-Video Input feed the deck’s analog recording path. Both are limited to standard-definition interlaced (480i). S-Video yields cleaner color separation than composite. The i.LINK ports feed the digital recording path and can store DV camcorder streams at native DV resolution and digital broadcasts as MPEG-2 transport streams, including HD content when supplied by a compatible tuner or D-VHS source. The RF pass-throughs do not record anything by themselves; they simply route antenna or satellite RF to other devices.
What Each Connection Lets You Play
Composite Output, S-Video Output, and D1 Output provide standard-definition interlaced video for any tape type. Use the stereo audio outputs for sound. The i.LINK ports provide a digital stream back out for devices that can decode DV or MPEG-2 transport; this is how you access full-resolution digital recordings made via i.LINK. The RF pass-throughs do not output the deck’s playback.
Resolution and Signal Behavior
All analog rear video jacks-Composite Output, S-Video Output, and D1 Output-deliver 480i. None of these carry audio. Audio always travels on the white/red RCA outputs. Analog inputs accept 480i only. i.LINK transports digital streams at their source resolution and bitrate; DV camcorders are 480i/576i in DV25, while digital broadcasts or D-VHS sources can be SD or HD. Full HD remains within the i.LINK domain and on tape; analog viewing remains SD.
Hooking Up to a Television
If the TV has S-Video and stereo RCA, connect S映像 出力 to the TV’s S-Video input and connect white/red 音声 出力 to the TV’s left/right audio inputs. Select that S-Video input on the TV. If the TV lacks S-Video, use Composite Output (yellow) plus the white/red audio outputs and select that AV input on the TV. If the TV supports D-terminal, connect D1信号出力 and add the white/red audio outputs, then select the D-input.
Hooking Up to an AV Receiver or Scaler
Connect either S-Video Output or Composite Output plus the white/red audio outputs to the receiver/scaler’s corresponding inputs. Route the receiver/scaler to the TV as usual. If the scaler accepts D-terminal, use D1信号出力 with separate white/red audio for the cleanest SD analog path the deck provides.
Hooking Up to a Capture Device
Connect S-Video Output to the capture device’s S-Video input and connect white/red audio outputs to the capture device’s stereo inputs. In capture software, select S-Video and line-level stereo. If the capture device lacks S-Video, use composite video plus white/red audio. For lossless digital ingest of DV or D-VHS streams, connect i.LINK to a compatible IEEE1394 interface and ingest the digital stream directly.
Recording from an Analog Source at the Rear
Connect the source’s S-Video or composite video to S映像 入力 or 映像 入力 and connect its white/red audio to 音声 入力 左/右. On the deck, select the corresponding Line input and press Record. The deck stores the incoming 480i signal; S-Video reduces color bleed compared with composite.
Recording from a DV Camcorder over i.LINK
Connect the camcorder’s IEEE1394 port to the deck’s i.LINK. Set the deck to i.LINK input, press Record on the deck, then Play on the camcorder. The deck writes a direct digital copy at native DV resolution with no analog conversion.
Recording a Digital Broadcast or Another D-VHS via i.LINK
Connect the digital tuner or D-VHS deck to i.LINK. Set this deck to i.LINK input and record. The MPEG-2 transport stream is written at its original resolution and bitrate, including HD when provided. Playback at full resolution is available again via i.LINK to a compatible device; analog rear outputs remain SD for viewing.
Using the RF and Satellite Pass-Throughs
Connect the rooftop or indoor antenna to VHF/UHF 入力(アンテナから) and connect VHF/UHF 出力(テレビへ/分配) to the TV’s antenna input. This preserves broadcast reception through the VCR. For satellite, connect the dish/LNB or BS tuner feed to BS-IF IN and pass it to BS-IF OUT, staying within the DC15 V 4 W pass-power printed on the label.
Choosing the Best Analog Picture Path
Prefer S-Video for the cleanest SD analog picture if your TV or capture device supports it. Use Composite when S-Video is unavailable. Use D1 when your display supports the Japanese D-terminal and you want component-style 480i from this deck. Always add the white/red audio pair to carry sound.
Verifying You’re on an Output, Not an Input
Before troubleshooting, confirm your cable is on 出力 when going to a TV/receiver/capture, and on 入力 when coming from a source you intend to record. Matching labels prevents the common “no picture” error.
Basic Troubleshooting Without Prior Experience
If the TV shows black-and-white after you used S-Video, change the TV to its S-Video input; many sets treat S-Video and composite as separate selections on the same jack cluster. If you have sound but no picture, re-check that the yellow or S-Video plug is on an output and that the TV is on the correct input. If you have picture but no sound, reseat the white/red plugs and select line-level stereo, not “mic,” on capture devices.
Japanese-to-English Translation Key (Rear Labels)
電源入力 = Power input 映像 = Video (composite) 音声 左/右 = Audio Left / Right S映像 = S-Video 入力 = Input 出力 = Output D1信号出力 = D-terminal 480i video output i.LINK = IEEE1394 / FireWire VHF/UHF 入力(アンテナから) = Antenna in VHF/UHF 出力(テレビへ/分配) = Out to TV / distribution BS-IF = Broadcast Satellite intermediate frequency DC15V 最大4W = DC 15 V power-pass limit リモートポーズ/AVコンセントリンク = Remote Pause / AV Compu Link
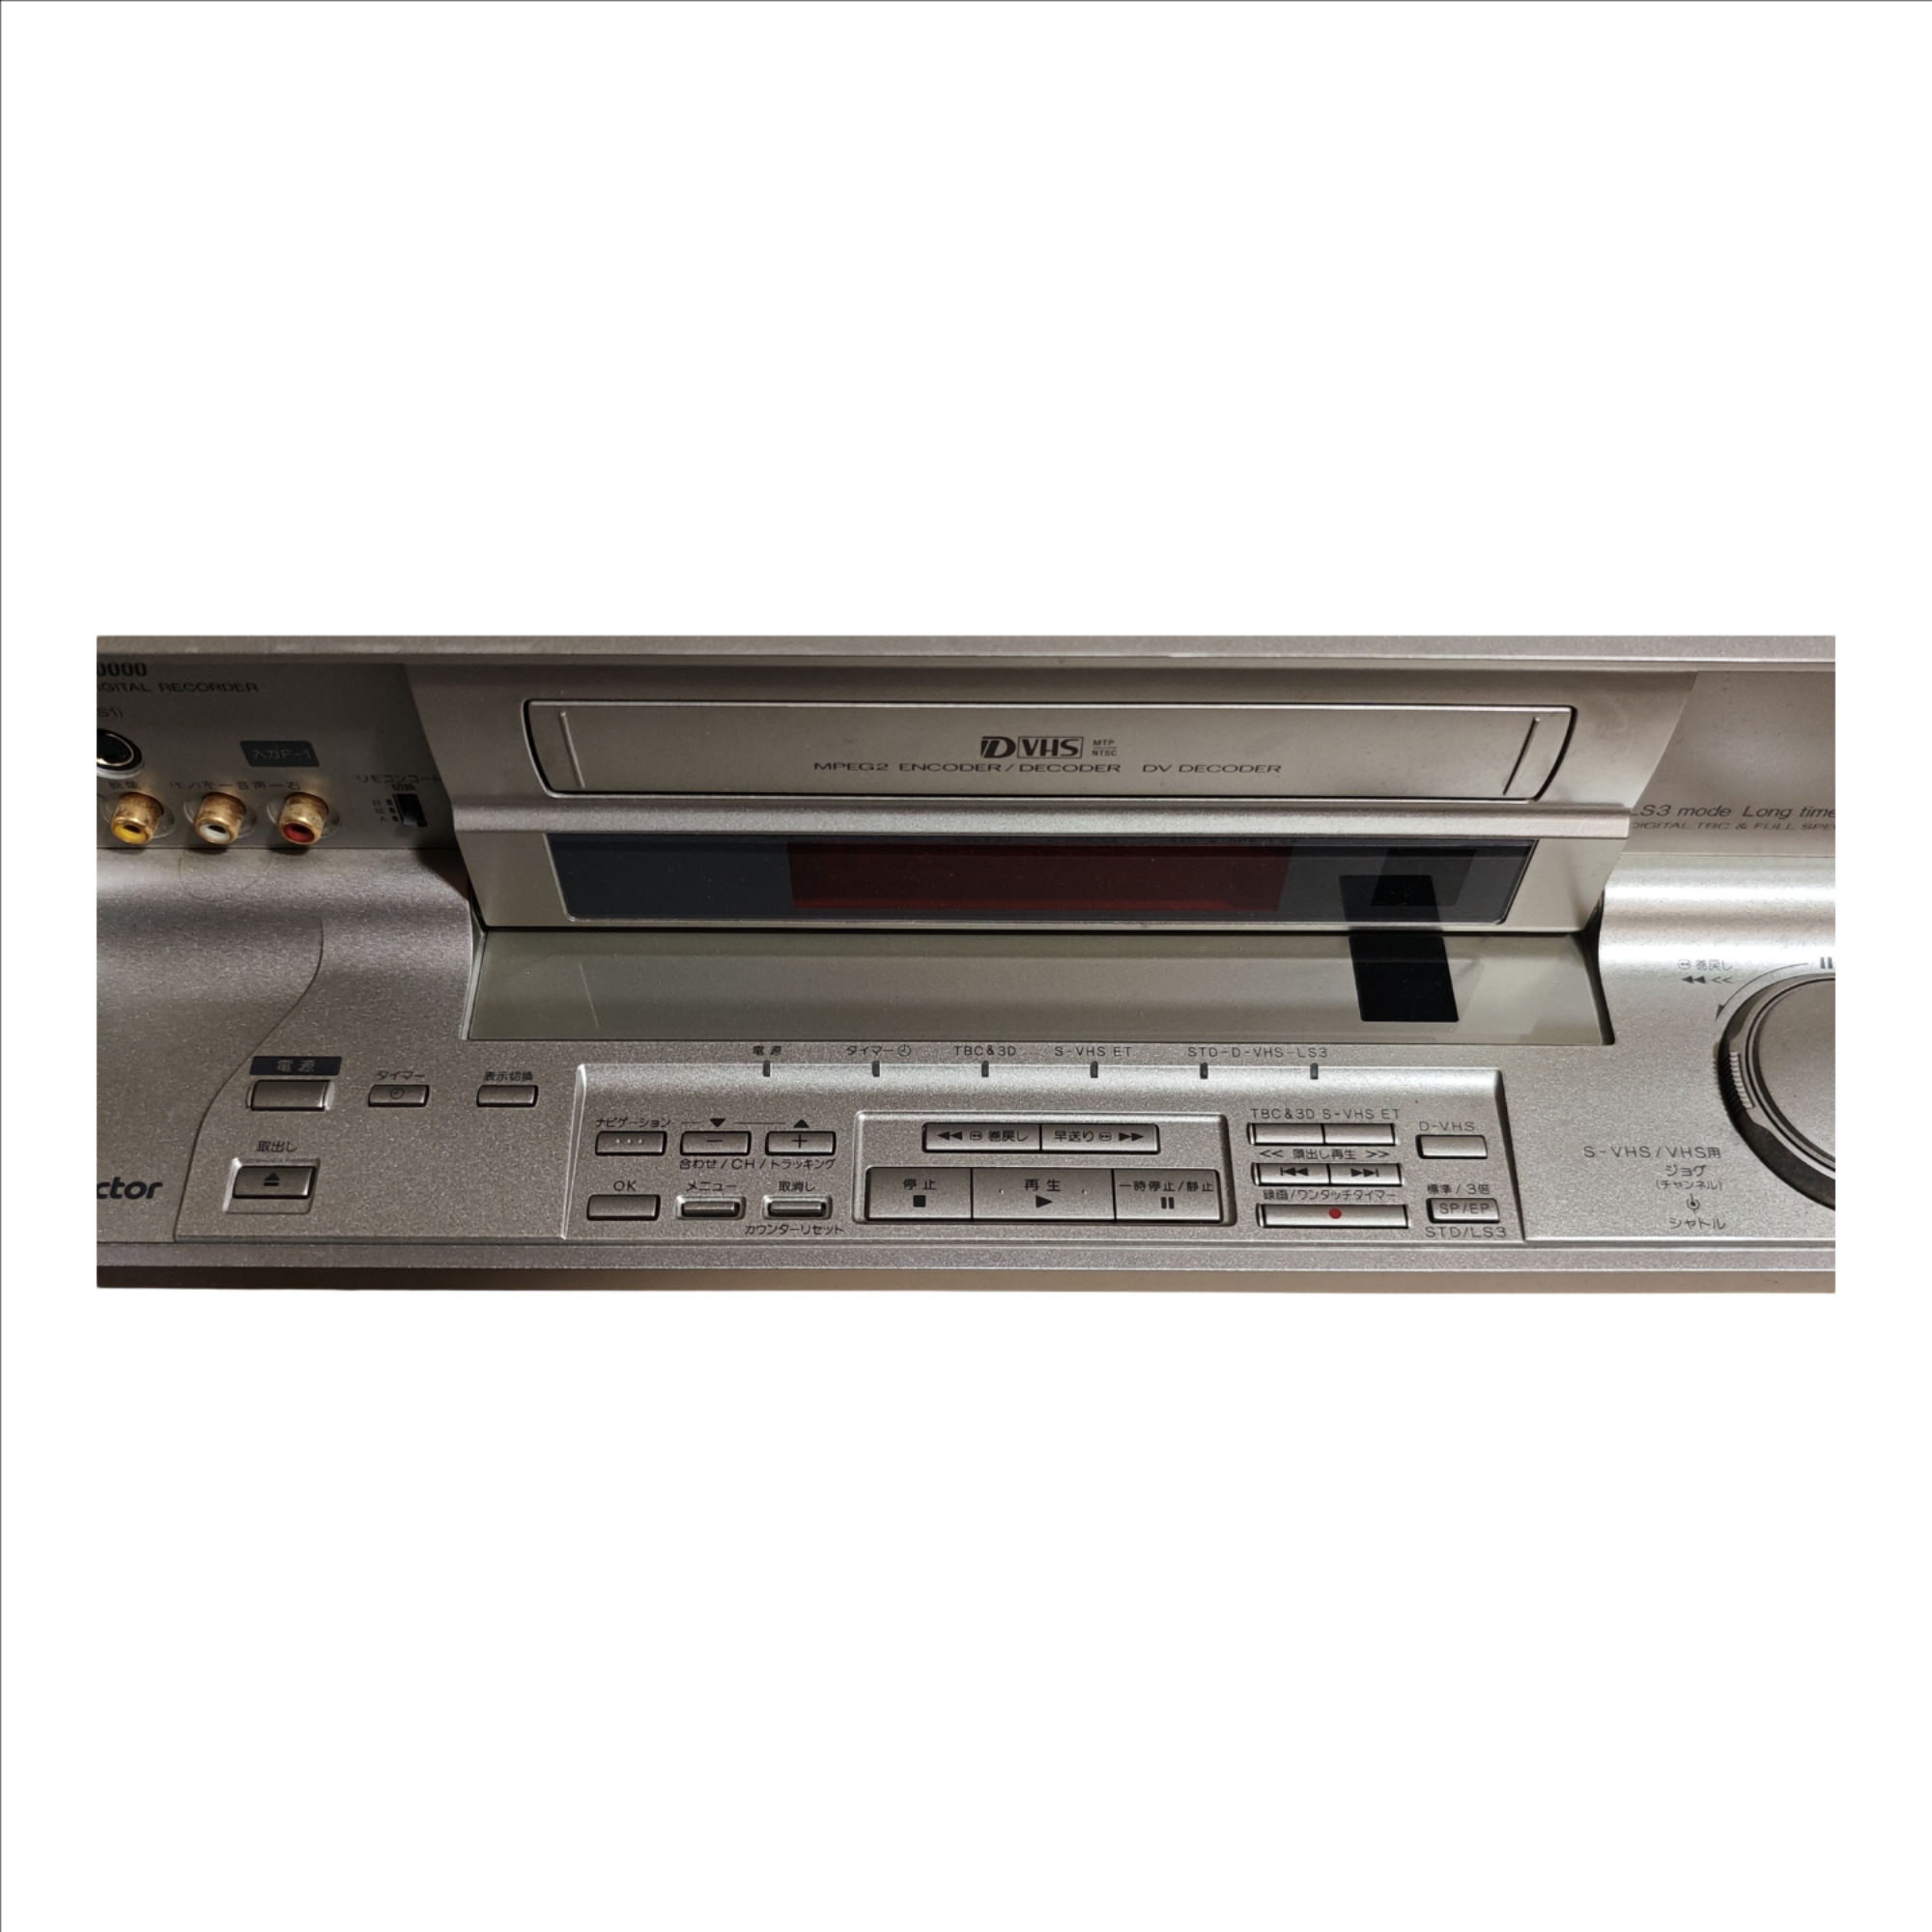
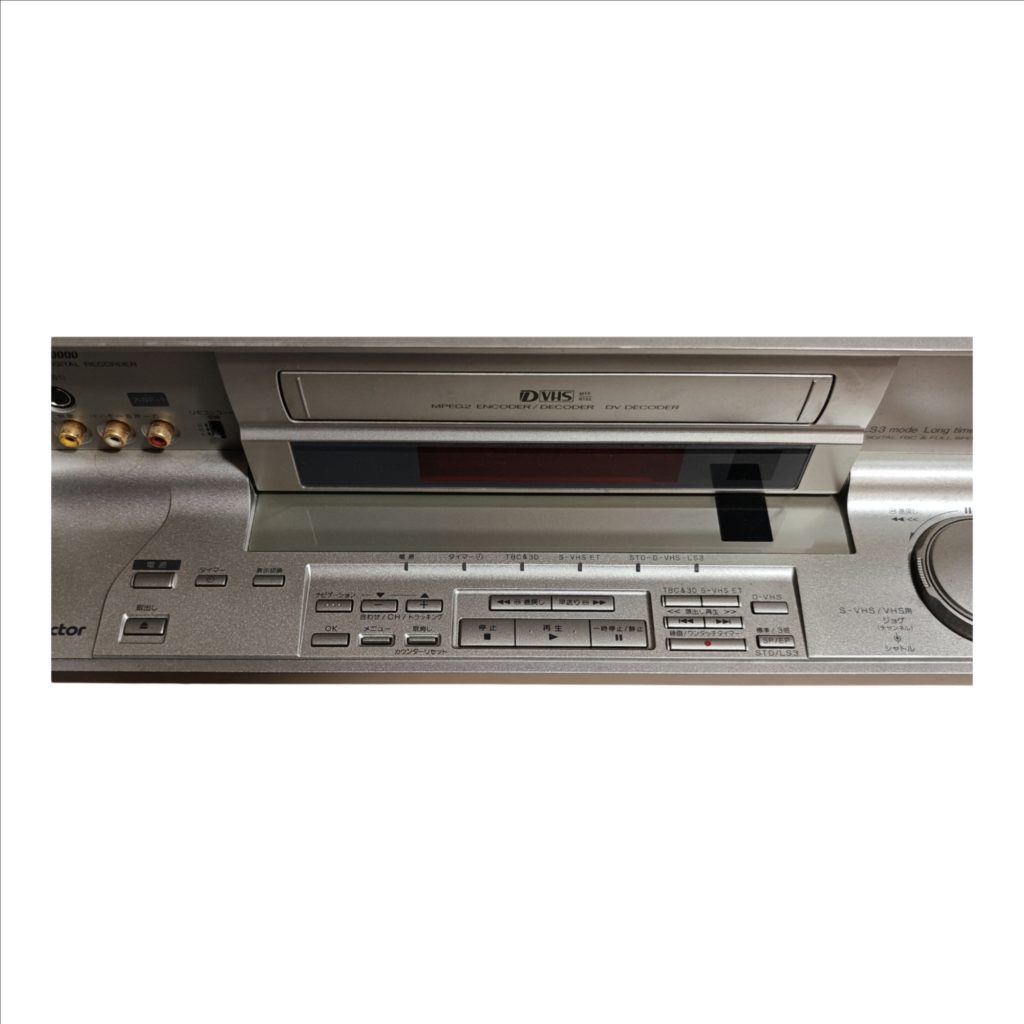
The Victor HM-DR10000 is a D-VHS digital video recorder that handles both analog VHS/S-VHS tapes and digital D-VHS recordings. A flip-down front door reveals quick-connect inputs and a full control bed, so you can dub from a camcorder, tweak tracking, and run transport without the remote. The center display has status lamps for Power, Timer, TBC&3D, S-VHS ET, and D-VHS speed (STD or LS3).
Front Overview
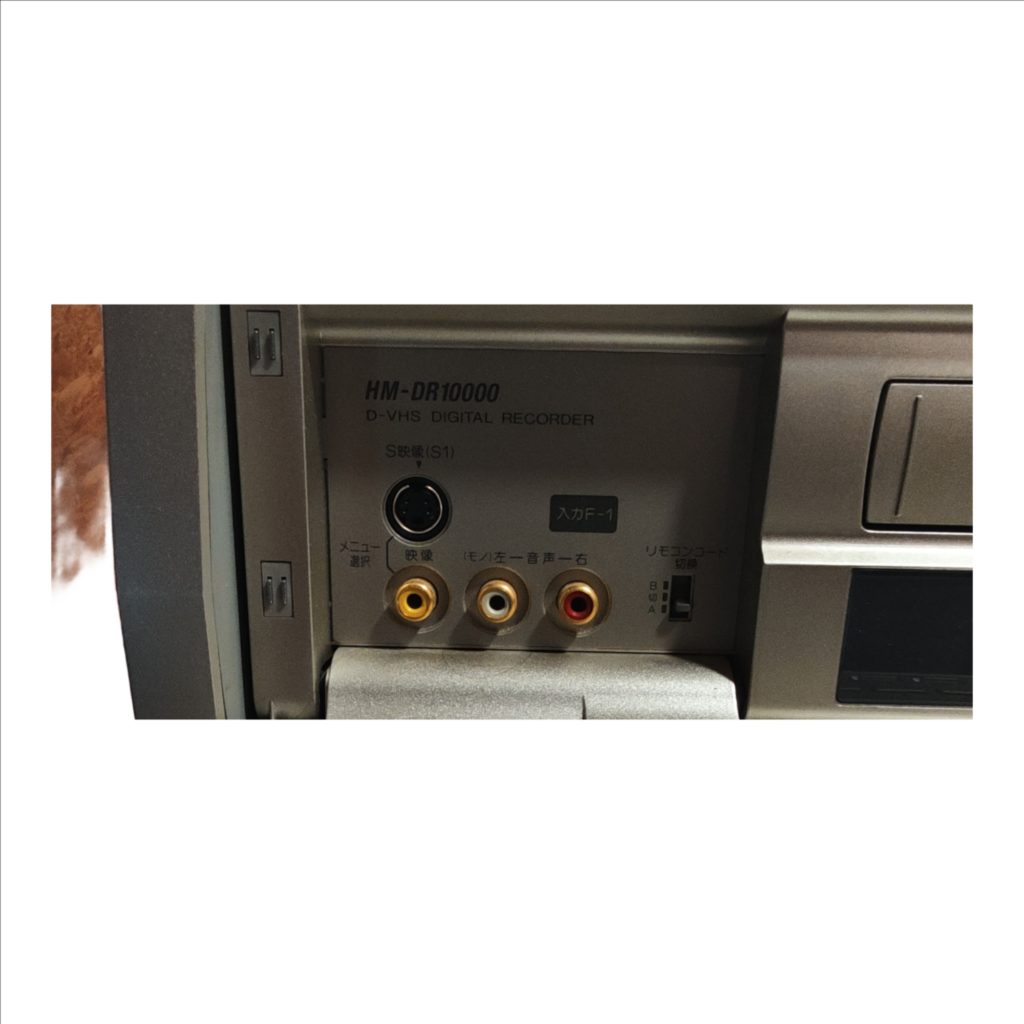
Left pocket “Input F-1” holds an S-Video jack and three RCA jacks (yellow composite video, white left/mono audio, red right audio) plus a tiny A/B switch to change the remote control code when you own multiple Victor decks. The cassette slot and window sit in the middle under the status strip. The right side carries a large jog/shuttle wheel for precise search when playing VHS/S-VHS tapes; the inner knob jogs frame-by-frame and the outer ring shuttles fast forward/back.
Basic Operation
To record from the front, plug your source into Input F-1, insert a tape, choose a speed (Standard/3× or SP/EP for VHS; STD/LS3 for D-VHS), press the Record/One-Touch Timer bar, then Stop to finish. To play, insert a tape, press Play, use Rewind/Fast-forward to navigate, Pause/Still to freeze, the jog/shuttle for fine search, and Counter Reset to zero the counter. Use Menu, OK, Cancel, and the Minus/Plus keys to set channels, inputs, and tracking.
Main Controls by Position
Bottom left corner: Eject → Power → Timer. Navigation block (immediately right of Timer): top row Minus and Plus (Adjust/CH/Tracking); below them OK (left), Menu (center), Cancel (right); “Counter Reset” is printed beneath. Transport cluster (to the right of Navigation): top row Rewind (left) and Fast-forward (right); bottom row Stop (left), Play (center), Pause/Still (right). Directly right of transport: Step-Playback rocker; below it the wide Record/One-Touch Timer bar with a red dot. Far right column (three small stacked keys): top = Standard/3×, middle = SP/EP, bottom = STD/LS3. Far right dial: Jog/Shuttle wheel for S-VHS/VHS playback/search.
Japanese-to-English Translation Key
電源 = Power タイマー = Timer TBC&3D = Digital time-base correction & 3D noise reduction S-VHS ET = S-VHS Extended Technology STD-D-VHS-LS3 = D-VHS mode indicators (Standard / Long Stream 3) S映像(S1) = S-Video input (S1) 入力F-1 = Input F-1 (front inputs) 映像 = Video L/モノー音声-左 = Left audio / Mono 音声-右 = Right audio リモコンコード 切換 A/B = Remote control code selector A/B 取り出し = Eject ナビゲーション = Navigation 合わせ/CH/トラッキング = Adjust / Channel / Tracking メニュー = Menu 取消し = Cancel カウンターリセット = Counter Reset 巻戻し = Rewind 早送り = Fast-forward 停止 = Stop 再生 = Play 一時停止/静止 = Pause / Still 繰出し再生 = Frame-step playback 前/次 = Previous / Next (index search) 録画/ワンタッチタイマー = Record / One-Touch Timer 標準/3倍 = Standard / 3× extended play SP/EP = Standard Play / Extended Play STD/LS3 = D-VHS Standard / Long Stream 3 ジョグ/シャトル = Jog / Shuttle S-VHS/VHS用 = For S-VHS/VHS use
Video File Maker exposes four named encode profiles – HQ Plus, HQ, Standard, and LP – so authors can match VP9 Profile 2 bitstreams (with Opus audio) to disc capacity and runtime instead of guessing CRF values in a vacuum. Pick the profile before you spend overnight GPU time; the menu and the blank must agree with that choice.
Shared rules
Output family: VP9 Profile 2; audio Opus as required by the format body of standards.
Batches: separate SDR and HDR10 scripts – HDR preserves metadata when the source carries it; SDR batches will not invent a grade.
Source: export SOURCE.mp4 at full 8K (7680×4320) when the project truly is 8K; lesser masters should not wear an 8K badge on the box.
Media: plan against 25 GB and 50 GB BD-R, or BD-XL when you need more than a single-layer/dual-layer pair can hold.
HQ Plus
Short premium 8K. Use it for demos, shorts, and showpiece reels where bitrate beats runtime. Sister-site guidance cites roughly seventy minutes near the ~22 GB class for the 8K tier as a planning ballpark – treat that as capacity intuition, then measure your own encode. If your “feature” is two hours, HQ Plus is the wrong button.
HQ
High-bitrate mastering for 8K/4K when you want headroom without the ultra-short constraint of HQ Plus. Suitable for prestige shorts-to-mid features and for keeping 4K fallbacks looking expensive. Expect to lean on 50 GB or BD-XL blanks once runtime climbs.
Standard
The workhorse: about a 100-minute movie on 50 GB-class media. First commercial-style titles and most fan restorations should start here. Standard is also the profile you use to teach the rest of the toolchain – if Standard will not burn and play cleanly, chasing HQ Plus will only hide the same folder or UDF mistakes under prettier pixels.
LP (Long Play)
Pack longer programmes onto 25 GB blanks (or stretch capacity when you refuse a second disc). Detail and high-motion scenes take the hit first. LP is honest engineering for lectures, long concerts, or archive dumps – label the case so nobody expects HQ Plus sharpness.
Choosing quickly
Measure runtime and whether you need true 8K on-disc.
If ~100 minutes and one 50 GB blank → Standard.
If short and showpiece 8K → HQ Plus.
If long and stuck on 25 GB → LP.
If mid-length with quality priority and larger blanks → HQ.
Batch discipline
Run the profile batch that matches the blank you bought. Confirm file sizes before Menu Maker; oversized HQ Plus outputs will not “fit if we omit the menu.” Multi-resolution discs often keep a hero tier at one profile and lighter 4K/HD companions – the menu must list only what exists. After encode, verify VP9 Profile 2 / Opus with your usual media inspector, then assemble UDF 2.60.
After the burn, spot-check a high-motion scene and a dark static scene at the hero resolution. Profile names will not save a bad master – soft focus stays soft – but they will stop you from promising eighty minutes of HQ Plus on a single 25 GB blank. Log the profile on an internal README next to the ISO so remasters six months later use the same contract.
Profile tables, Video File Maker releases, and the authoring guide live on 8kdvd.hddvd-revived.com. Profiles are capacity tools; use them that way and the red box will match the bits inside.
Subtitles on 8KDVD sit in an awkward but workable middle ground: the disc UI is browser-based HTML, the video is VP9 Profile 2 with Opus, and there is no Blu-ray-style presentation graphics engine guaranteeing every deck will render the same soft-sub track. Plan for Chromium and the Windows Player, time your cues carefully, and decide early whether you need switchable soft subs or burned-in text that cannot miss.
Soft subs vs burn-in
Soft (SRT / WebVTT alongside the menu or player): switchable languages, no re-encode when you fix a typo, better for accessibility and multi-region discs. Depends on the player/launcher honouring the track or the HTML <track> / player API path you wire up.
Burn-in (hardcoded into the VP9 encode): universal – whatever opens the video shows the text – but locks language, burns bitrate on glyphs, and forces a full re-encode for corrections.
Prefer soft for dialogue; reserve burn-in for forced narrative cards you refuse to lose, or for archive titles where one language must always appear.
Timing SRT and WebVTT for browser menus
Export a dialogue list from your NLE or subtitle editor with the same frame rate as the master (23.976 vs 24 vs 25 mismatches are the classic “everything drifts after reel two” bug).
Author in SRT first for ease; convert to WebVTT when the HTML5 video element or launcher expects .vtt.
Keep timestamps in HH:MM:SS.mmm (WebVTT) or HH:MM:SS,mmm (SRT) consistently – mixed separators break parsers silently.
Cue length: aim for readable chunks (roughly one to two lines, ≤42 characters per line for living-room distance).
Place cue files where Menu Maker / the launcher expects them; reference them from the menu or player config – orphan .srt files will not invent a track list.
Smoke-test in Chromium: enable the track, scrub mid-film and credits. Use UTF-8; mixed encodings often fail after the first reel.
Sync tips that actually matter
Spot-check against a clap or a known line, not against “feels right.”
If the whole track is late/early by a constant, shift globally; if drift grows, your frame-rate assumption is wrong – fix the root, do not nudge every tenth cue by hand.
If the menu offers both 8K and 4K streams with different leaders, one subtitle file will drift on the other. Pad cues per stream or keep leaders identical.
HDR grades can make white text disappear on bright skies; use outlined or shadowed styles when the player allows CSS/WebVTT styling.
Wiring soft subs into the disc UI
Soft subs usually arrive as SRT converted to WebVTT, referenced from the menu page or a small config the Windows Player understands.
One file per language, named clearly (en.vtt, de.vtt), UTF-8 without a BOM if a browser chokes on the first cue.
A visible menu control: On / Off and language – do not rely on users knowing a keyboard shortcut.
Relative paths only – absolute C: leftovers are how living-room demos die. Watch case sensitivity when you author on Windows and test on Linux.
If the HTML path refuses local tracks (browser file:// security), fall back to the Windows Player path for that title or burn-in the primary language and keep soft files as a PC-only extra in a documented SUBS folder.
Accessibility without overclaiming
Browser-based disc UI means screen-reader behaviour and forced-narrative support will never match a certified Blu-ray player. Do the basics: high-contrast cues, sane reading speed, separate SDH when you can, and a menu label that says which language is active. Document on the package that subtitles are provided via the HTML/Windows playback path so buyers with exotic HTPC stacks know to test.
Legacy 8KDVD Maker accepted language codes plus SRT during its wizard; the modern Video File Maker + Menu Maker path expects you to integrate cues deliberately. When in doubt, follow the current authoring guide on 8kdvd.hddvd-revived.com, verify on both Windows Player and Chromium, and treat “works in VLC opened on the raw WebM” as a bonus – not the shipping definition of an 8KDVD subtitle.
Dick Miller’s Walter Paisley freezes mid-gesture in a coffee-house crowd, clay under his nails, eyes already calculating the next “sculpture.” The jazz combo behind him keeps noodling as if nothing uncanny has entered the room. That is Roger Corman’s A Bucket of Blood (1959) in one frame: hipster satire with a body count, shot before anyone invented the term “meta.”
Walter wants to be an artist. He becomes a murderer who covers corpses in clay and calls it modernism. The beatniks applaud. The cops eventually do not. Corman allegedly knocked the whole thing out in five days; you can feel the calendar in the sets, and that is half the charm.
8KDVD’s gift to a film like this is cruel honesty. Grain is present and correct – not scrubbed into plastic, not exaggerated into “vintage filter.” Faces under the coffee-house lamps show every smear of makeup and sweat. The clay figures, once blurry blobs on tired 16mm transfers, now look like what they always were: cheap, funny, and slightly sick-making.
Beat poetry, murder, repeat
Dialogue still crackles with that late-fifties parody of cool – cats, man, squares, the whole glossary. On a wide track you catch more of the room tone between lines, which somehow makes the jokes land harder. Miller plays Walter as both clown and predator; ultra-clear close-ups favour the predator without killing the clown.
Black-and-white contrast on this encode is properly mid-century: deep blacks in the studio corners, bright whites on Walter’s apron that bloom just enough to remind you this was not shot on an Alexa. Night exteriors keep their murk. No one has “rescued” the shadows into grey porridge.
Corman’s camera rarely lingers, but when it does – Walter alone with a fresh lump of clay – Miller does the quiet work that later cult careers get built on. You see him decide. At this resolution the decision is in the eyes, not the score. The coffee-house patrons remain a gallery of types, and that is fine; satire thrives on types. The disc simply refuses to smear them into one beret-coloured mass.
The vinyl nightmare, literalised
There is a particular pleasure in hearing the film’s diegetic jazz with real bit depth. Cymbals no longer smear into white noise. When the crowd snaps its fingers in that fake-hip unison, you hear individual hands, which is both funny and faintly horrifying – a Greek chorus in turtlenecks.
The 8KDVD case art leans into pulp, correctly. Menus do not overstay. Playback is clean through the montage cuts; Corman’s editing still feels like someone racing a stopwatch, and the disc keeps up without stutter.
British specialist counters used to hand-sell this beside Little Shop as proof that AIP could do nasty jokes with style. The red box continues that tradition without the laminated photocopied sleeve notes. You get the film, the grit, and enough bitrate that the clay never turns into MPEG porridge mid-reveal.
Is this essential Corman? For Miller completists and anyone who likes their horror with a sneer, yes. For everyone else it is sixty-odd minutes of American satire that understood Instagram culture sixty years early: make something shocking, call it art, watch the room clap. The red box just makes the clay glisten.
8KDVD menus are HTML and JavaScript living on the disc, not a proprietary Blu-ray HDMV project. Menu Maker exists for authors who want control: background art, chapter entries, and – critically – buttons that switch between 8K, 4K, HD, and optional 3D bitstreams without leaving the launcher. Get the links wrong and users will swear the format is broken when you simply advertised a file you never encoded.
What Menu Maker produces
The tool builds the navigation layer consumed by the Universal Web Launcher and the Windows Player. Output is a menu folder: HTML entry points, assets, and wiring to your Video File Maker tiers. Smoke-test that folder in Chromium on the hard drive. If the menu fails locally, burning will not fix it.
Build workflow
Clone or download 8KDVD-Menu-Maker from GitHub.
Point it at the encoded video tiers from Video File Maker (HQ Plus / HQ / Standard / LP outputs as applicable).
Set background art – stills around 3500 px wide or wider keep large displays from looking soft.
Enter title text and button labels your audience will understand (“Play 4K”, not internal filenames).
Enable only the resolution variants you actually produced. No 8K button without an 8K file.
Add chapter names that match real access points in the encode when the menu supports them.
Export the menu folder into the disc structure beside the media files.
Open the menu HTML in Chromium; click every button once.
Wrap with ImgBurn as UDF 2.60 or drop the folder into your ISO build.
Resolution switching without surprises
Multi-resolution discs are the format’s everyday flexibility: one red case, several decode targets. The menu is the contract. If Standard encode only produced 4K and HD for a long feature, the 8K button should stay off. Conversely, a short HQ Plus demo may ship 8K + 4K and omit LP entirely. Document the available tiers on the packaging back so retail browsers know what the plastic contains.
Design habits that save support mail
Keep the first screen sparse: Play, Resolutions, Chapters, Credits.
Use high-contrast text over busy key art; living-room viewing distance is not a desktop.
Test HDR titles with the Windows HDR path and SDR titles with HDR off – menu chrome should remain readable either way.
Ship launchers for the platforms you claim; do not bury index.html five folders deep without a starter.
Browser reality check
Because navigation is web tech, behaviour tracks Chromium more than a Hollywood player SoC. Local file permissions, autoplay policies, and GPU decode limits all show up as “menu bugs.” Prefer the Windows Player for demos; keep the HTML path as the cross-platform fallback (Windows, macOS, Linux, Android). Watch the master tutorial linked from the official authoring guide when the UI fields feel opaque – fifteen minutes of that footage beats guessing button IDs.
When something misbehaves, isolate layers: broken art path vs wrong media URL vs player chrome. Swap in a plain coloured background; if buttons suddenly work, your asset path was wrong. If Play still fails, the menu is fine and the bitstream path is not. Keep a known-good sample ISO from the project site as a control disc so you can tell “my menu” from “this PC cannot decode VP9 at 8K.”
Downloads and the living authoring guide are on 8kdvd.hddvd-revived.com. Menu Maker is half the modern toolchain; pair it with Video File Maker and only then argue about box art.
Your first 8KDVD should be boring on purpose: one title, one language, one encode profile, a short menu, then a verified burn. The modern pipeline is Video File Maker → Menu Maker → UDF 2.60 image/burn. Skip the legacy all-in-one wizard unless you are reproducing an old demo.
What you need on the bench
Source master: full-resolution SOURCE.mp4 (7680×4320 when you truly have 8K). Keep HDR10 metadata if the project is HDR.
Video File Maker (V1.0.1 HDR or current GitHub release) with hundreds of GB free on a fast internal drive.
Menu Maker for the HTML navigation layer.
ImgBurn (or equivalent) set to UDF revision 2.60.
Blank BD-R 25 GB / 50 GB, or BD-XL if capacity planning says so – and a burner that can write them.
Windows Player plus a Chromium browser for smoke tests.
Step 1 – Pick a profile before you encode
HQ Plus, HQ, Standard, and LP are capacity contracts, not quality slogans. For a first disc, Standard is the sensible default if you are aiming at a ~100-minute feature on 50 GB-class media. HQ Plus suits short premium 8K demos; LP is for packing longer programmes onto 25 GB. Decide once; do not mix “HQ Plus menu copy” with an LP bitstream.
Step 2 – Encode with Video File Maker
Extract Video File Maker where the batches can write large intermediates.
Place your master where the scripts expect it (follow the release README / authoring guide naming).
Run the SDR or HDR batch that matches your master – do not run HDR scripts on plain SDR hoping for magic.
Optional: prepare anaglyph Source3D.mp4 only if you will ship a 3D menu button.
Confirm outputs are VP9 Profile 2 with Opus as required by the format body of standards.
Step 3 – Build menus
Point Menu Maker at the encoded tiers. Set background art (wide stills work best), title text, and chapter labels. Enable 8K / 4K / HD / 3D links only for files that exist. Export the menu folder into the disc tree beside the media. Open the HTML in Chromium from the hard drive before you burn anything.
Step 4 – Assemble and burn
Collect menu HTML, media, and launchers into one disc root as the authoring guide describes.
In ImgBurn, create an image or write folders with filesystem UDF 2.60, recurse subdirectories, set a sensible volume label.
Burn BD-R/BD-XL at a conservative speed; enable verify.
Play the burn in the Windows Player, then again via the HTML launcher. Switch resolutions once each.
First-disc failure modes
Empty ISO / missing files: rebuild from the assembled folder with UDF 2.60; do not assume a wizard left a good image.
Menu advertises 8K, only HD plays: you linked a missing tier – re-export Menu Maker.
Encode finished, disc won’t fill: wrong profile for runtime; replan bitrate vs blank capacity.
Budget an evening for the first burn even if the encode finished overnight: folder assembly and UDF settings cause more failed discs than codecs. Full living documentation, downloads, and the official authoring guide sit on 8kdvd.hddvd-revived.com. Get one Standard disc working end-to-end before you chase multi-disc HQ Plus box sets.